Introduction
Welcome to the Deep Mod Galactic Modding Handbook. In this handbook, we cover:
- Modding documentation
- Modding guides
Contributing
If you would like to contribute documentation or guides, please see Contributing.
Contributing
The handbook is written in Markdown and is rendered via mdBook. Please see
mdBook’s usage guide for how to use mdBook locally to render your documentation.
CI is setup to automatically deploy from master.
mdBook Basics
Precompiled mdBook binaries are available at https://github.com/rust-lang/mdBook/releases.
You can also install mdBook via cargo after you install Rust:
cargo install mdbook
You can watch the file changes and preview the rendered HTML files via
mdbook serve --open
Getting Started
Basic Modding Guide
DRG Mods: An Introduction to Modding
Please do not hesitate to ask for help! You can find talented modders in the DRG RND Discord or the DRG Modder's Guild Discord.
Credits:
Rauliken - Originally wrote guide.
Jen Walter - Original guide contributor.
Pacagma - Original guide contributor.
NaturalBornCamper - Original guide contributor.
Akira Fudo - Original guide contributor.
Buckminsterfullerene - Maintains guide and moved to mod.io.
Fancyneer - Update with common issues and new tools.
Contents
- 1. Introduction and tools
- 1.1 The basic knowledge
- 1.2 The basic tools
- 2. Things to learn before modding
- 2.1 Unpacked the game's files
- 2.2 Checking the content of the files
- 2.3 Using mod_lint to check if your mod will auto-verify
- 2.4 Packing your mod files
- 2.4.1 Preparing your project for packaging
- 2.4.2 File packing method
- 2.4.3 Mod installation and uploading
- 3. How to mod
- 3.1 Hex mods
- 3.2 Other mods
- 4. Common issues and how to solve them
- 4.1 My mod isn't working/vanilla files are still playing or present
- 4.2 My mod is crashing when I go to test it
- 5. Conclusion
1. Introduction and tools
1.1 The basic knowledge
There’s still a lot of things to do in DRG even if you have all the cosmetics and promoted all characters to the max level. Welcome to DRG modding, you are going to like this game even more after learning how to mod it. If you find it too difficult just try the current mods that the modders have released and have some fun. I’m at 1k hours myself and I would have stopped playing if it wasn’t for the amazing mods.
Some VERY IMPORTANT THINGS before starting:
- Make sure you’ve read the official info about DRG’s mod support in the links below. I’m not going to go into details here so make sure you read them to understand the basics. The main post here. The FAQ with some additional info here. You can also check the 3 guides created by GSG in the mod.io guides section.
- Mods are only hosted here on mod.io. Use the modding menu inside the game to create an account automatically so you can upload your mods.
- Your vanilla or modded save files are safe because mods will not corrupt/mess with it unless you use the tools maliciously. If you are concerned about this use the save clone and backup feature that the game provides in the menu.
- This guide only covers the bare minimum, so if you want to learn more, make sure to read some of the other guides on mod.io.
I highly recommend reading sections 1. and 2. from top to bottom if it’s your first time.
1.2 Basic tools
First you are gonna need some tools to start modding. You can find all of the tools explained here on this lovely site. This is an overview of the basic tools, and then in the next section I will show you how to use them.
1. FSD-WindowsNoEditor.pak
This is the main file of the game, which contains all the rest of the files. It’s “paked” with Unreal Engine so we need to extract the files if we want to modify them.
You can find it in …\Program Files (x86)\Steam\steamapps\common\Deep Rock Galactic\FSD\Content\Paks. You obviously need the game installed and NEVER DELETE THIS FILE, just copy it if you need it later. If you don’t know how to access this folder go to Steam library -> right click DRG > Properties > Local Files > Browse Local Files. If you want to make a lot of mods it is recommended to make a dedicated space for the extracted files inside it when we get to that point.
2. DRG Packer
This tool will allow us to extract the files from FSD-WindowsNoEditor.pak and will also let us pack our own files. The files that you extract will have the extensions .uexp and .uasset which are Unreal Engine files. More on this on 2.1 Unpacking the game’s files.
For older users of the guide: you don’t need UEE anymore with the new version of the packer if you just want to make hex mods.
3. UAssetGUI
This is used to see the contents of the files and change values. You are going to need it if you want to make mods that change a value/s inside the game files. There will be an example in 3.1 Hex mods. If the tools don’t work then you may need to download the .NET Runtime. You can find the Github repository for this open-source tool here.
4. EmptyContentHierarchy
These are all the folders inside an extracted FSD-WindowsNoEditor.pak but empty, just the folders. This will be useful later to pack files and for UEE in other guides. Each major update will have a different one, so make sure you get the one from the most recent version of the DRG Modding tools website.

5. UModel
This tool will allow you to extract the audio files, textures, 3D models etc. This is different from DRG Packer because that just extracts the cooked .uexp and .uasset files whereas if you want to dive deeper and get the raw original sounds, textures, etc. you are going to need this. You can find it in the modding tools website as well as at the official website.
6. FModel
This tool will give you "readable" files (JSON) from the .uexp and .uasset pair files. UAssetGUI already parses the files but they may have problems and in my opinion it’s easier to search for that value you want to change in FModel before you edit it. It can also extract raw sounds but not as well or as easily as with UModel. Again, you can find this at their official website.
7. Unreal Engine Editor (UEE)
If you want to make mods to replace audio and textures you need this. You can also create your own Unreal Engine blueprints (which are way more complex than hex editing mods or audio mods but can do more stuff). You can find it here. Unfortunately you need to download the Epic Games Store even though we just want Unreal Engine and not the games but if you want to avoid downloading the store, or use Linux, you will need to build from source, which you can google how to do.
You are going to need to download the version that DRG is made with, which is version 4.27.2.
Go to the Library, add a new version with the + symbol -> click the arrow next to install -> and the version. You only need the basic installation so you can configure it and remove everything but the basic stuff so the installation takes only like 13 GB of storage instead of 30+ GB.

8. Other tools
Those are the main tools you need but there’s way more in the tools channel in the modding discord (tools for specific types of mods, console unlocker, research tools etc).
2. Things to learn before modding
2.1 Unpacking the game's files
First you are going to need to download DRG Packer from our modding tools site. This is our fresh DRG Packer folder after extraction:

Now we want to extract all the files from FSD-WindowsNoEditor.pak. Simply copy drag and drop FSD-WindowsNoEditor.pak into _Unpack.bat.

Now wait for the extraction to complete. The command line window will say “Press any key to continue…” when it’s done you will see a new folder called FSDWindowsNoEditor. The files of the game are inside it.
We are not going to use the contents of the Engine subfolder and the other folders
inside FSD that are not Content.
You need to re-extract the files again for each update the game receives.
2.2 Checking the content of the files
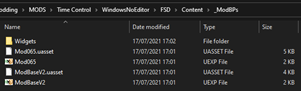
If you go to the FSD/Content folder, you will find the extracted files. All of these contain the pairs of .uexp and .uasset files that we are going to need.

For example, if we go to FSD\Content\WeaponsNTools\FlameThrower we can see all the files for the flamethrower. For editing values like upgrades or base stats we can open some of the files using a software like FModel or UAssetGUI to have more readable text.
We are going to be working on this file later in 3.1 Hex mods to learn how to search for and change the values inside. If you want to extract other things like sounds or textures you will need to use UModel and extract the desired file/s. For example, we open it to get one of Molly’s sound files.
Select the FSD-WindowsNoEditor\FSD\Content folder, select these settings and press OK:

We navigate the folder tree until we find our file or a folder with all the files we need (you can extract the whole Audio folder for example if you want all the sounds in the game), and after selecting extract we select an output folder:

If it’s a sound, 3D model, texture file etc you will get a few files in the extraction folder.
2.3 Using mod_lint to check if your mod will auto-verify
Mod_lint is an invaluable tool developed by AssemblyStorm. which can be used to check if your mod will pass the mod.io verification check. You can download it from here. To use it, simply open up Windows Powershell/command prompt, drag mod_lint.exe into it, press space, then drag your packed mod’s zip file into it as well, and press enter. The tool will now go through your mod and give you a list of all the assets you’re replacing and if they’re eligible for auto-verification.
A single No flag in your file will make it ineligible for auto-verification, and you have to either remove those files if you don’t need them, or wait for manual verification if said files are required for your mod.
2.4 Packing your mod files
2.4.1 Preparing your project for packaging
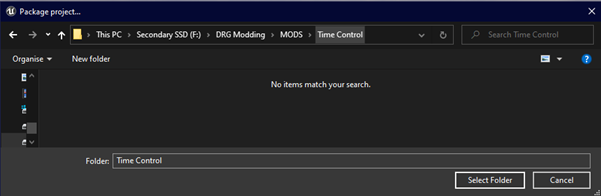
First and foremost, before we pack our mod files, we need to tweak a few options in the Packaging Settings. Go to File -> Package Project and click Packaging Settings.
Untick Use Pak File.

Use the search bar at the top and type “shader” and then untick Share Material Shader Code

Use the search bar again and type “cook”. This will take you to the packaging settings and in it you will see a field called “Directories to never cook”. This is your project’s directory blacklist. Configure it in a way that is appropriate for your mod. For example with sound mods, you will want to put SoundControl in this list.

As a side note, if you are using the FSD-Template project, you will need to clear out the blacklist of any entries you don’t need, as it is set to blacklist everything by default.
2.4.2 File packing method
I’m going to use the example from the flamethrower file before (imagine we already edited it even though that comes later in the tutorial). You should probably read about Empty Content Hierarchy if you haven’t already.
In the flamethrower example, the file is UPG_FlameThrower_A_RangeIncrease which is inside FSD\Content\WeaponsNTools\FlameThrower. To pack mods correctly we are going to need to replicate the same folder structure that we got on the output folder (unpacked FSD-WindowsNoEditor.pak) but inside the Input folder.
You can just open the .zip from Empty Content Hierarchy (which has all the folders from the game but empty) and drop the Content folder in it inside Input and replace the placeholder one there:

In this case we just want to work with 1 weapon so you don’t need to have the rest of the folders. You can just drop the WeaponsNTools folder inside Input -> Content.
You can also delete everything but the FlameThrower folder too. I recommend having a backup of each folder structure for each mod you make, for easier packing, instead of just having all of the empty folders and having to search where you put the files.

This will be the final path of the flamethrower files:

You can do the process before for any number of files that you modded.
Be careful when leaving folders in Input -> Content after packing because maybe you’ll start making a new mod and forget you still had the old mod files in there.
Now just drag and drop the Input folder into _Repack.bat. (FSD here is just the extracted files from before, I recommend renaming them to the update where they are from).

Check the “Added x files” line. If you have for example 2 files in the mod check that the number is correct so it says “Added 2 files”. If there’s less than what you expect you forgot to put some files in the input folder, if it’s more than expected then you forgot to remove files from a previously packed mod.

So, the summary of packing is that we only need to add or remove files inside the Empty Content Hierarchy (FSD and subfolders) with the correct folder structure compared to the vanilla files. It can get pretty messy if you forget to add/remove files when making new mods so (again) I recommend having a backup of each folder structure for each mod you make, for better organization and future updating.
2.4.3 Mod installation and uploading
To install a mod for your own testing purposes before uploading, simply move the .pak than you made in the previous step to: …\Steam\steamapps\common\Deep Rock Galactic\FSD\Content\Paks. You MUST put _P at the end of the .pak name in order for the game to load it.
Unreal Engine automatically replaces the original file(s) in FSD-WindowsNoEditor.pak when the game loads, with the file(s) that you modified in your mod.
In the in-game modding menu, your mod will show up as "depreciated" and will force you into a sandbox save.
To upload your mod to mod.io after testing your modname_P.pak, first read the following guidelines if you have not already done so:
After that click on the + button on drg.mod.io and follow the simple steps.
3. How to mod
There’s different types of mods that you can make for DRG:
- Hex - can be used to edit values and are extremely easy to make
- Audio - is also easy but takes a bit more time as well as Unreal Engine Editor
- Model/texture - can be fiddly to make and ideally requires knowledge in the field before starting but leads to very appealing mods
- Blueprint - uses Unreal Engine blueprint to create complex behaviour as it has full logical capabilities and can interact with the game's underlying code
In this guide I’ll be explaining the basic hex mods. At the end I’ll mention a few of the other guides to get you started with more complex mods. As always you can find everything in the Tutorials channel category in our modding discord.
3.1 Hex mods
We have the hex mods, which edit values inside the .uasset and .uexp files (all files are in pairs of these types) and replace the original files with your new ones when the game loads. These values can be integers, text, booleans, floats etc. Most of the values should be easy to find just by using the armory inside DRG but you need to keep a few things in mind.
We need to know the value that we are going to change but also the file where it is located. You can check the File Prefix List made by Elythnwaen in the #learn-tools channel.
I’m gonna be working with the file that I used in the packing example before, in 2.3.1 File packing method. In this case our mod is going to have only one file which is called UPG_FlameThrower_A_RangeIncrease.uexp and as you can tell by the prefix UPG this is the file that controls the range upgrade for driller’s flamethrower.
I’m going to be using UAssetGUI. Open the .uasset and explore a bit. To change a value go one of the categories:

In the Amount field is the value we are looking for. It’s 500 because the upgrade of +5 in game is measured in meters and it's centimeters in the files. Some values can be more obvious than this. We’ll change it to 2000 so it becomes a 20 meter range upgrade.
If you can’t find the value try using FModel. Open the main .pak from the game, navigate to the folder, go to the Assets tab on the top right and open the file. Use CTRL+F to search stuff. This is pretty useful in other files that have a lot of stuff but isn’t really needed for this small change.

Finally, we just save the file in UAssetGUI with CTRL+S or File -> Save and we are ready to pack our mod. You will get 2 new files and the tools might make a backup (.bak) of the original ones.

You should know how to pack that those file pairs with one of the methods that I showed you earlier in 2.3 Packing your mod files. I used these exact files in both examples to make it easier to understand the whole process.
After packing, just follow 2.3.2 Mod installation and you are ready to test your new flamethrower upgrade that will add +20 meters instead of +5. As you can see in the armory when I hover over the range upgrade it now gives us 20 extra range. You can try the range overclock too for some insane flame reach :P

Here’s a quick guide of all the steps for hex mods:
- Extract
.pakfiles with DRG Packer by dragging the.pakinto_Unpack.bat. - (Optional) Read the files with
FModelif you want more info about the value you want to change. - Open the
.uassetfile you want to change with aUAssetGUIand edit the values you want. - Now to turn it back into
.pakagain follow these steps: (an example for the barrel kick force mod that modifies onlyPST_BarrelKicking.uexp):- Create the same folder structure inside
DRGpacker -> Input -> Contentas the original extracted files had and add the modified files, so:/GameElements/PawnStats/PST_BarrelKicking.uexp - Drag and drop the
Inputfolder to_Repack.batand check that there are no errors.
- Create the same folder structure inside
- Put the generated
new_P.pakfile in to test it:…\Steam\steamapps\common\DeepRockGalactic\FSD\Content\Paks - After testing it to make sure it works, rename it to
InsertNameHere.pak, as you don’t need the_Panymore. - Upload to mod.io after reading the guidelines. Write proper descriptions and choose the correct category. You should have no issue if you read the info links.
And there’s a few important things about mods:
- If your game crashes, DO NOT send the crash report to the devs. You probably changed the wrong value or changed file size.
- Most mods are client-side only (as opposed to mods that have the RequiredByAll tag on mod.io are meant to have server replication). Client side only means that installing these mods only effects stuff for your game, but not for other players in the lobby.
- As I explained in the packing tutorial, you can have more than 1 file in a mod. You don’t need to make 10 .pak files if you modify 10 files, just make a single one by adding more files with the correct paths to the
Input -> Contentfolder. - You can change a lot of things with hex editing, not only the weapon’s stats. If for example you change a perk, you will need to try the changes inside a mission to make sure they work because those don’t show up in the armory.
- This type of modding is the most basic but It will complement the others. For complex "hex style" mods like adding overclocks, changing character inventories… you should use blueprint modding with the reconstructed content to make it all very easy for you to edit.
3.2 Other mods
Now that you know the basics you are free to check all the other guides and tools.
For audio and blueprint mods the user Buckminsterfullerene#6666 has made some great ones.
For model and texture replacement Pacagma#1515 is your guy.
Fancyneer#1553 is also someone who is keen to help out with a wide array of mods such as audio, model replacement, and animation.
Make sure to checkout the modding tools site to find other tools.
4. Common issues and how to solve them
4.1 My mod isn't working/vanilla files are still playing or present
This issue is caused by your content folder hierarchy being incorrect and/or your file names not matching with the files you want to replace. Go back to your mod content folders and make absolutely sure the folder structure and names match. GSG’s naming conventions are a bit weird sometimes so you have to be very vigilant about this. Being just one letter off will make your mod not work. So double, triple, even quadruple check the names and hierarchy so that they match.
As an example; here I am replacing the Glyphid death scream sound cue, but my replacement isn’t working.

That is because my folder hierarchy isn’t correct. Here is the same file being replaced but this time it’s using the correct hierarchy:

Notice any difference? The one which isn’t working has a hierarchy of Content/Audio/Enemies/SpiderGrunt/DeathScream. However the correct hierarchy was actually Content/Audio/SFX/Enemies/SpiderGrunt/DeathScream. There needed to be an SFX folder after Audio and before Enemies in order for the replacement to work.
4.2 My mod is crashing when I go to test it
This largely depends on what kind of mod you’re making. With Blueprint mods it can be anything from null references to bad logic and those are often project specific things to troubleshoot. If it’s a simple asset replacement mod, then go to your packaging settings and make sure Share Material Shader Code is disabled.
If the problem still persists, and you’re creating a model replacer mod, you’ll have to go and find a common pattern to the crashing and work from there. Here are two common crashes and their causes;
If you’re replacing the model for the minigun and your game crashes when you start firing, this means you haven’t assigned the heat material to any part of your model. You will need to assign every base material somewhere in your model to avoid crashes. So go look at the material setup of the model you are trying to replace and see how many material slots it already has. Then assign all of them somewhere on your model.
If you’re replacing an enemy model and the game crashes when it despawns, this is because your model’s material lacks the dissolve logic the base glyphid material has. You will need to copy that material over to your own project and then edit it to fit your own model.
5. Conclusion
I hope you found the guide simple enough to understand and that you make many great mods. It’s been a long time, we started this community with 2-3 modders and a small private discord and now we have members in the thousands, the developers added official mod support and with this guide we have a new modder to welcome :) - Rauliken (Original author)
If you ever feel frustrated when making mods don’t forget that there’s always someone willing to help, it’s a very wholesome community. You can find a ton of info in the #mod-chat channel in our discord and there’s even a channel where people stream themselves making mods so you can all learn together.
If you ever want to check some old mods for inspiration, extracting the files to see which ones they changed etc, this is the Github repository where the old Update 33 mods were before the modding support update.
See you in discord and in the mines, ROCK AND STONE!
Blueprint Modding Guide
DRG Mods: A Comprehensive Guide to Blueprint Modding
Please do not hesitate to ask for help! You can find talented modders in the DRG RND Discord or the DRG Modder's Guild Discord.
Credits:
Buckminsterfullerene - Originally wrote and maintains guide.
OurLordAndSaviourGabe (AKA Banagement) - Advanced replication explanation section.
MichaelG123 - Secondary advanced replication section.
Contents
- 1. Introduction
- Tools
- Reading this guide
- Final note
- 2. How blueprints work
- How BP mods are loaded into DRG
- Framework mods
- Methods of BP modding
- Useful acryonyms to know for BP modding
- 3. Setting up your UEE workspace
- 4. No-dummy method
- Creating your first DRG mod
- A bit more complex version
- Outputting time dilation to the HUD
- Toggle HUD button
- Saving and loading settings
- Basic replication
- Advanced replication
- 5. Dummy method
- Kill player on button press
- Self-destruct Bosco on button press
- 6. Packaging your mod
- Using DRG Modding Automation Scripts
- From UE
- Directories to never cook
- More Help
- Video Tutorial
- Feedback
1. Introduction
Tools
Before you can even get started with your mod, you need to install a few tools:
- DRGPacker
- Unreal Engine
4.27.2(it will look like just 4.27.0 on the epic games launcher, which is good to download) - Visual Studio 2019 or 2022, with "Desktop Development with C++" and "Game Development with C++" packages checked in the Visual Studio Installer
- The most up-to-date game dumps (if you are using the BP dummy method explained later)
- The FSD template project (if you are using the C++ dummy method explained later)
IMPORTANT: By the time you are reading this guide, you should already have these tools and have at least the minimum required knowledge to use them (more on UE4 later). If not, I refer you to Rauliken's more general guide.
Reading this guide
Make sure that you read through every detail of this guide thoroughly as missing something may result in many problems down the line. Of course, you can always refer back to this if you need assistance on anything. Critically important details are highlighted in bold, and optional but useful information is highlighted in italics. Inline code is used for 'specifics'.
You should know the basics of Blueprinting in Unreal Engine. There are plenty of tutorials on YouTube. You should also know how Blueprinting associates with C++; here is a really good video on that. If you haven't already, watching this video is basically a requirement to understand much of what is going on here.
If you are into other forms of UE modding, please don't hesitate to join the UE Modding discord server.
Final note
Please be aware that as BP modding becomes increasingly advanced, this guide may become out of date until I update it. Since I'm really busy all the time this may not happen for a few days or weeks.
2. How blueprints work
How BP mods are loaded into DRG
Native spawning is something that was added by the developers when the modding update dropped. This allows you to load your blueprint from the BeginPlay event node. If you want your BP mod to have user-interactable UI (like a settings menu), you should use a framework like ModHub.
Framework mods
Usually, you will only want to use a framework mod if you want the user to be able to change settings for your mod in game. If you don't need this for your mod, you do not need to use a framework. Framework mods so far have always come in two parts:
- The devkit tools that you put into your mod's UE project for interfacing with your mod
- The in-game mod dependency that runs all of the framework's functions and processes
I suggest that for now, as you are learning BP modding, that you don't touch any frameworks, otherwise you'll find yourself spending more time wrangling with widgets than actually learning new techniques.
ModHub
ModHub is a shared-settings mod interface. You can use this to add your mod settings to a central place.
DRGLib
Samamster has been developing this framework as a more feature-rich BP modding library. The great thing about this library, is that it provides helper functions and DRG-like UI objects that makes BP modding just that little bit easier. You can view both the source and guide for use here.
Methods of BP modding
There are two methods, in a way that you can use both at the same time or not if you wish:
- No-dummy method. This doesn't require any knowledge in C++ to use. You also won't need the game dumps. This is limited to built-in UE BP functions and events or those you have from a framework devkit, or you created yourself. You can still achieve a fair bit from this but are limited.
- Dummy method. You can manipulate the functions, variables and events that are running in the game. You can figure out what you need from looking at the game's dumps files. You can find the most up-to-date dumps versions here (be aware that GitHub only displays the first thousand classes on its website version).
Useful acronyms to know for BP modding
- ABP – Animated BluePrint
- BP – BluePrint
- GD – Game Data
- GM – GaMe
- ID – IDentifier
- ITM – ITeM
- LIB – LIBrary
- LVL – LeVeL
- MUT – MUTators
- OC – OverClocks
- PRJ – PRoJectile
- UI – User Interface
- UPC – UPgrade Category
- UPG – UPgrade Group
- W – Widget
- WND – WiNdow Widget
- WPN - WeaPoN
3. Setting up your UEE workspace
For ANY Blueprint mods, you MUST name your project FSD. Therefore, I make all my mods inside the same project and then delete the mods I don't want to pak before I pak them. The reason the name must be FSD, is because that is what the original game's UE project is called. "FSD" is probably the code-word for DRG (most games have these for various reasons).
First, select the games category, then click next:

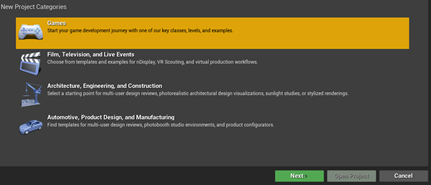
Then click on blank and click next:
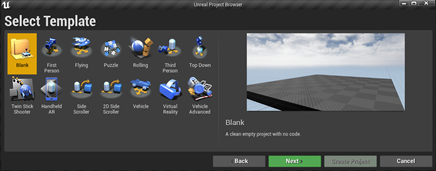
Select the following options on the project settings:
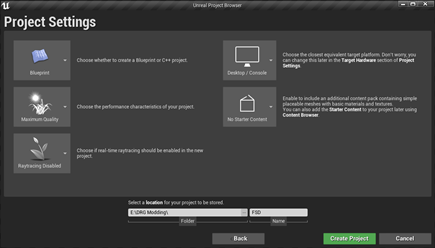
Then hit create project, and you're ready to move onto the next part!
4. No-dummy method
I'm going to run through the creation of a super simple mod which then outputs text to the screen, and finally saves and loads mod data. Note that my UE might look different to yours – don't worry, I'm just using a couple of plugins that makes it looks nicer.
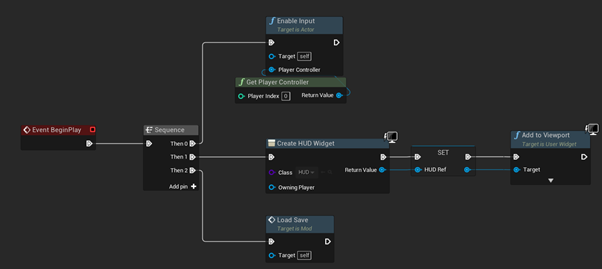
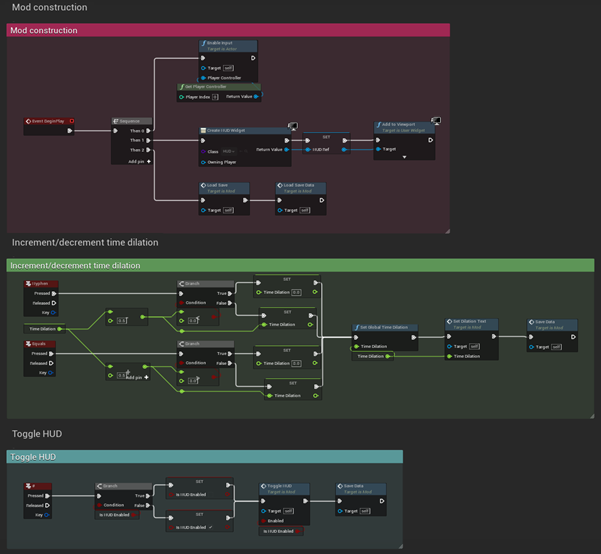
Creating your first DRG mod
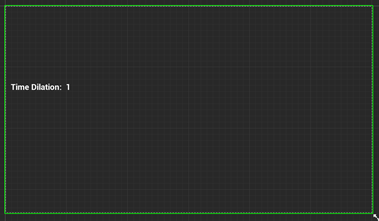
This mod will simply set the global time dilation (the speed) of the game to 5. The purpose of this mod is to just run through the process of making a mod – the time dilation bit will validate that we know the mod is loaded.
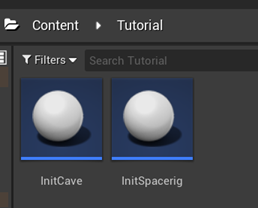
To spawn a blueprint into the game, first you need to create a folder with the same name as your mod inside the Content folder. Then create a blueprint inside of that called one of two things:
-
InitSpacerig– this will load your blueprint when the player is spawned in the spacerig. -
InitCave– this will load your blueprint when the player is spawned in the drop pod at the start of a mission.
To make a blueprint, right click inside the content browser and hit Create Blueprint Class. Then inherit it from Actor.

Double click on InitSpacerig first, and navigate to the Event Graph tab. We can ignore Event ActorBeginOverlap and EventTick. Drag off Event BeginPlay and find the set global time dilation node:

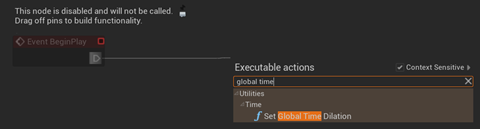
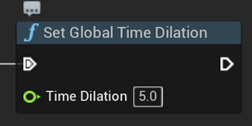
Now set this to 5.

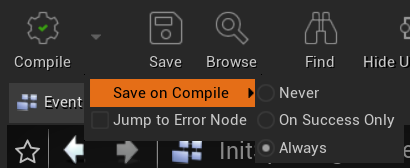
To save, hit the Compile button on the toolbar. Remember to compile and save your project every now and again. Tip: you can compile and save at the same time when you click compile, by clicking the little arrow dropdown to the right of compile button and setting save to "always":

Now we are ready to package and test this simple mod.
Refer to section 6 on packaging your mod.
When you load into the game, everything should be moving 5x as fast! More importantly, now you know how to make blueprint mods!
A bit more complex version
This time around, the mod will change the time dilation based on a key press.
First though, let's streamline the same mod to be loaded by both InitCave and InitSpacerig, since we don't want to copy and paste everything into both BPs.
Make a new BP called something like Mod (it doesn't matter). Now in InitSpacerig and InitCave, we want to spawn this actor immediately. Get out a Spawn Actor From Class node, and set the class to whatever you called your mod BP. Do this in both InitSpacerig and InitCave:

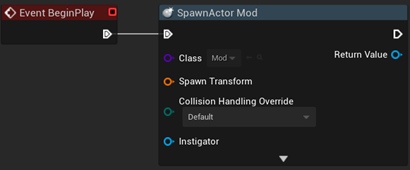
We're not quite done yet, we need to set Collision Handling Override to always spawn, ignore collisions. Also, right click on that orange Spawn Transform pin and hit split struct pin. If you don't do this, it won't know where to spawn the actor. Later on, if you're spawning a physical actor but don't want it to be seen, spawn it at like Z=99999.
Make sure to compile and save when you're done in both BPs!
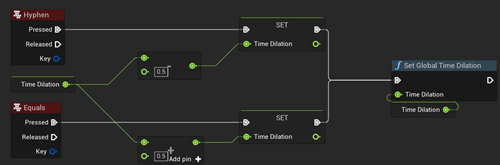
Now inside of your new mod BP, we want to add the functionality that increments or decrements the global time dilation based on what key you press. Let's say that the hyphen key decrements it by 0.5 and the equals key increments it by 0.5.
First, let's make a variable that stores the time dilation. Set its default value to 1. Now we need to get the key events. Right click on the graph and type Hyphen and get out that node, and then do the same for Equals. Make sure that you enable input when the mod is spawned, otherwise this won't work:

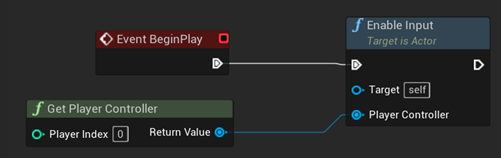
Player index 0 is always host, i.e. your player if you are the only one in the server or hosting a server.
Now make your mod functionality like this (you should have done basic blueprinting before as a pre-requisite to this so you should be able to easily follow what this does):

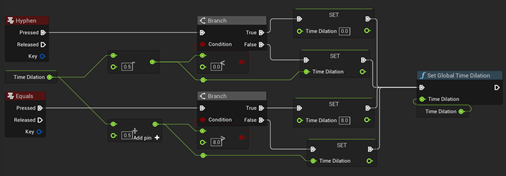
Now let's make sure that the dilation never goes below 0 (otherwise the game crashes) or higher than 8 (otherwise FPS is reduced the rubble):

Before we go any further, let's compile, package and test the mod.
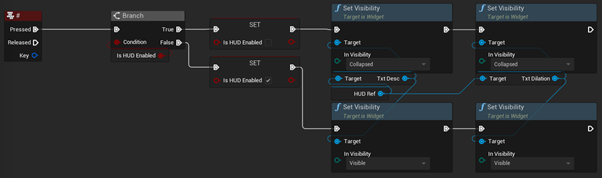
Outputting time dilation to the HUD
Now we want to output the current dilation to the HUD (Heads Up Display) so we can see the value in-game.
In our Tutorial folder, make a new widget blueprint called something like HUD:

Inside of the widget designer, find the text box widget in the palette and drag it out. Place it anywhere on the window – I recommend putting it about 2/3 the way up the left or right side of the window, which is where we know there is empty space on the DRG HUD. This text will just be some text like "Time Dilation:". Next to it, put another text box with the text "1". This is where we will change the value. The default dilation in the game is 1 so we set the default text to match that.

Now name that second text box to something sensible. You also need to check the Is Variable box, otherwise we won't be able to change it from our mod BP.

![]()
Hit Compile and switch back to the mod BP. To access and set our text box, we need to first construct the widget and get an object reference from it:


This HUD Ref variable is our object reference. The variable type is that HUD widget:

![]()
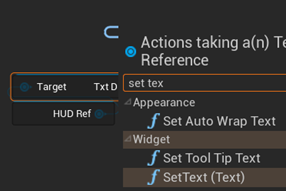
Now drag out the HUD Ref variable and we want to get the object reference to the txtDilation:


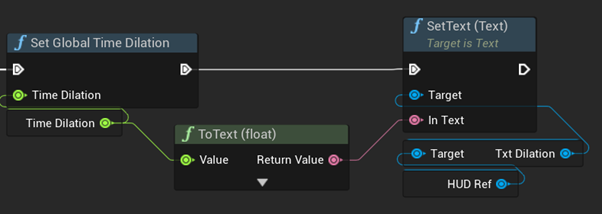
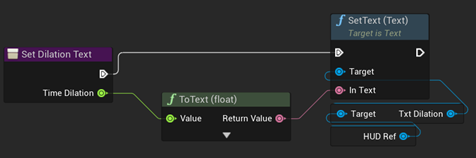
Now to set its text, we drag out the Set Text (Text) node:

Now we want to set the text to the value of time dilation:

Now we can see our time dilation and that it changes when we hit our key binds. But what if we want to toggle the HUD on or off?
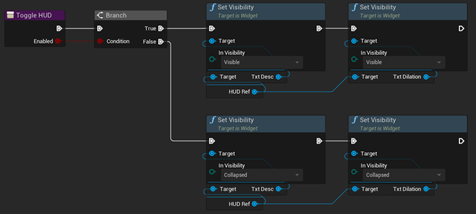
Toggle HUD button
First, we need to go back into our HUD designer and set that description text box to a variable so we can control it from our mod:

![]()
Now back in our mod, make a variable that will store the boolean value of whether or not the HUD is enabled. Make sure the default value is true.
When a key, say, '#', is pressed, we want to switch the visibily of the text boxes between Visible and Collapsed (you can read the tooltip regarding the differences between Collapsed and Hidden):

Let's check to see if this works!
Now… what if we want to save the dilation and if the HUD is enabled so that the next time the mod is loaded we save our settings?
Saving and loading settings
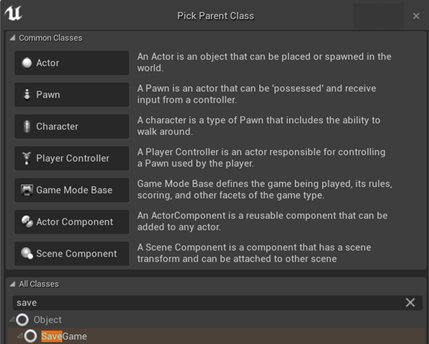
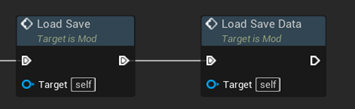
We first need to make a new blueprint that inherits the SaveGame class:

Inside of it, simply make the two variables that we want to save, and make sure that they are set to public:

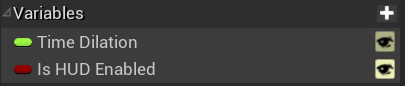
Back in our mod, make a variable that is an object reference to this SaveData blueprint:

![]()
Now let's make a function that will load the save. This checks if the save game exists, and if it does, load the game from the slot. If it does not, we create an empty save game object. The save file name is Mods/[your mod name]/[your save name]. The saves are stored at FSD/Saved/SaveGames. Here my save name is Mods/Tutorial/Settings:

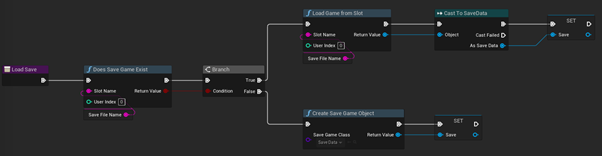
Call this function after we construct our widget (I've added a sequence node to tidy up a bit).

Now we want to make another function that loads the save data into our mod variables. We also want it to change the HUD values, i.e. if the HUD is disabled in the save, we want to toggle the HUD off when we load it in:


Chuck it after load save:

The Toggle HUD and Set Dilation Text functions are just what we have already done but put into functions so that we don't have duplicated code.


The last thing we want to do is save our values every time we change them. So let's make a new function that does this:

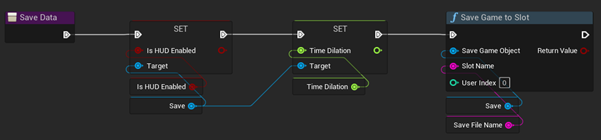
Now we call this function when we change time dilation and the HUD value. Now the mod looks like this (I've tidied it up with comments):

Now, compile, package and test. If you toggle your HUD off, and set dilation to like 5, then restart the game, your settings should be saved!
But we want this mod to work in multiplayer, so we need to do a bit of basic replication and handling with that.
Basic replication
Before you read this section, I suggest that you go watch some basic UE4 replication video on YouTube as it will explain the basic processes that I will use here. If you're not interested in replication (it's hard), don't worry, you can skip this section without any problems.
While the mod works perfectly fine in singleplayer, it goes all a bit funky in multiplayer. If you're the host, you need to replicate (copy) the time dilation that you're setting for the rest of the clients in the server. Otherwise, anything client side only (like player movement) will not be affected. And if you're not the host, then you shouldn't be able to change the time dilation because otherwise things get even more funky if yours is different to the server's.
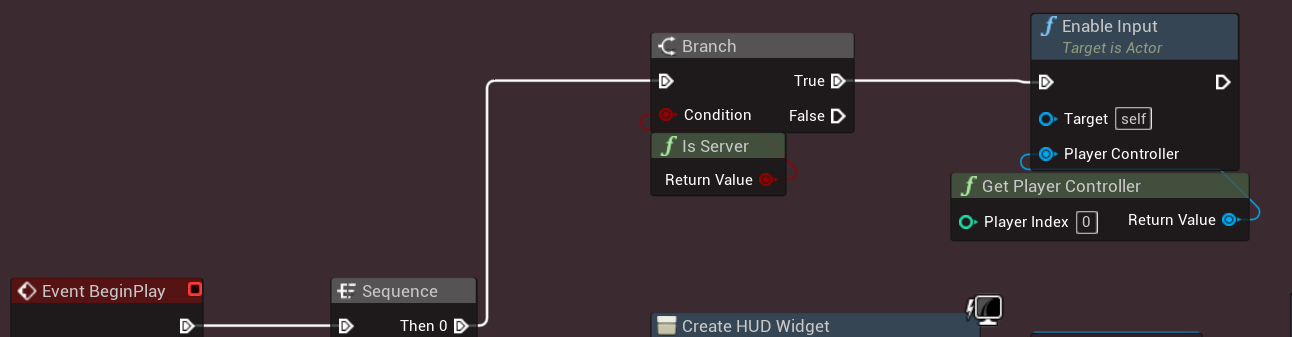
So firstly, let's just get the easy bits out of the way. If a client is not the server, disable the input so that they can't change their local time dilation value. We can do this by simply using the Is Server node:
We also need to prevent the time dilation from being set when the save is loaded. While we could do the same Is Server check before the entire load save section, we want to still allow all the clients to load the Is HUD Enabled value from their own saves. So we can just do the check inside of Load Save Data instead.

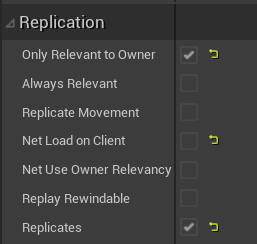
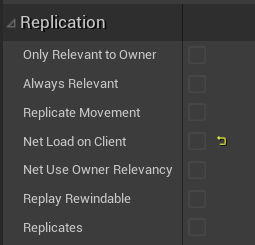
Now for the fun stuff. First, we need to change the mod settings to allow replication. Click Class Defaults on the top bar and change the replication settings like this:
You also need to go into the class defaults for InitCave and InitSpacerig and change the replication settings like this:
Next, we need to actually set the Time Dilation variable to replicate. You can do this by clicking on the variable and setting the Replication parameter to RepNotify. The reason we want to use this, instead of just Replicated, is that we want to notify the clients when the value of it changes.
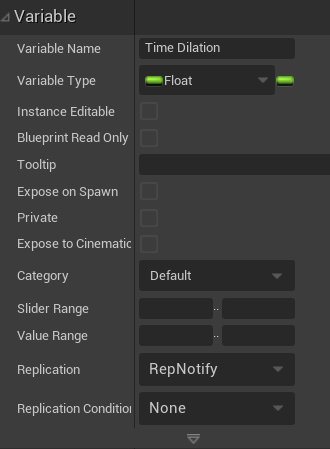
You may notice that in the functions pane, a new function called OnRep_ e.g. OnRep_Time Dilation, has been created. This function is called by every client whenever the value is changed, including the host. You may also notice that 2 white spheres have appeared on all the variables' getters and setters - this shows that the variable is set to RepNotify (one sphere is Replicated). You can also hover over the setters and it'll tell you how it works.
So inside this new OnRep function, when we then set the global time dilation and HUD value, we need to make sure that it only runs for non-host clients (AKA remotes). To achieve this, we can use the Switch Has Authority node and pull off execution only when remote. Then we set the global time dilation and the HUD text:

Then you're done! You don't need to call the OnRep function - this is done automatically everytime the variable is set.
Now to test, you will need a friend (oh no, this isn't looking good for you) to check that all the logic works as expected. To achieve this, you will need to make a new hidden mod on mod.io and use the preview link or add your friend as a moderator so that they can subscribe to it.
Advanced replication
For this section, you will need to download and build the FSD Template project (explained at the start of the 5th section).
"Advanced" replication here is defined as anything more than replicating just variables. This is really, really hard to wrap your head around, because due to the nature of this being modding, 90% of normal replication tutorials aren't going to help you. I highly suggest that you attempt to make at least one mod of your own first before attempting this.
There are two types of advanced replication you need to know about:
- Approved replication. This is a mod where we can be certain the code will run on the server, and the clients have the events sent to them due to the
RequiredByAlltag that you can give your mod to force everyone else in the server to have the mod. - Verified replication. This is where the mod only runs on the client, but still is able send and recieve events to and from other clients in the lobby. This is best used for mods that say, send chat messages to everyone in the server.
Firstly though, Banagement (AKA Our Lord And Saviour Gabe Newell) explains the main ideas of advanced replication using all of his vast experience (and amazingness).
A thorough explanation of advanced replication
Banagement here, I'll be taking over for a bit.
For an actor to replicate you will need to change a few class default variables on the new actor, these are - Always Relevant, Replicates.
If this was a pawn (character / enemy), some sort of actor with a model, or whatever may affect the world space and it is planned to move at any point then you would also enable Replicate Movement.Actor Components do NOT need to be replicated if the owning actor is replicated, this applies for Child Actors too.

With the above setup this actor will now replicate to clients when spawned by the server / network authority which means that only one has to exist instead of one per player.
When this actor is spawned by the server it will behave just like the host variant for clients so no de-sync should occur for most actions (this is explained in the "Info Passer Logic" section).
Later on I explain how you can also use this method to create a client spawned replicated actor so that the host / server can "see" the clients version of the actor and update their data accordingly.
You pretty much only want to use this client spawned method to pass data and not spawn anything that affects the world space.
If you are doing something more than just altering visuals for a verified mod such as "Fancy Steeve" then this can and will cause issues if it is spawned by the client.
For example if the client spawned actor were a model, pawn, etcetera it will create new "ghost" instance(s) that exist on the client but not on the host so data can be mismatched such as it being unable to be killed, messing with collision for the client and some logic called by a client owned actor can crash clients.
InitCave / InitSpacerig Logic
So let's take a look atInitCave or InitSpacerig actors, the same logic should apply for both. Ideally you would use InitCave or InitSpacerig to only spawn your own actors to perform your mod logic.
Before anything, I highly recommend NOT doing is using Child Actor Components on InitCave or InitSpacerig as there is a nasty problem that causes multiple instances of those child actors, usually exponential for clients. This can be fixed by spawning an actor via InitCave or InitSpacerig that spawns its own child actors.
Let's say you want to spawn an actor of some sort; you will usually want this to be a server only action so there are no "ghost" instances (described in previous section).
To achieve this it is as simple as using 2 nodes, Is Server pure function and Branch (you can press B and left click to quickly place in an event graph), just plug these two together to make a boolean check using the True or False execution pins. You will want to put the Spawn Actor From Class node on the True output, this essentially says "If Server / Host / Network Authority, then spawn this actor" so it is not possible for clients to do so. Supposedly using the Has Authority macro is what is used for actual game development but it can be confusing to utilize without understanding it well.
I bring the following up because it comes into play when setting up actor spawning. You do not want to use object references from something that has not been spawned yet as it will be a null pointer and will either crash the game or break logic in an actor that is trying to reference a specific class for criteria.
Unreal Engine 4 is silly and tells you that Sequence nodes are executed in an order, 1-2-3 as the logic completes. This is false, everything assigned to a sequence node is executed at the same time.
This can be circumvented with Delay nodes,Async nodes, Set Timer By Event nodes, delayed loops ( Sequence + Delay ), etcetera.
What I would recommend is using InitCave or InitSpacerig as a means to spawn your own logic actors rather than putting the entirety of the logic within it because it can cause a lot of issues.
You want to be able to differentiate your mod from others so you should name these spawned actors appropriately in relation for your mod.
This is an example from my Mission Content Randomizer mod:

You do not need to assign ownership at all from my understanding, I just did it as a precaution since I ran into so many issues for replication before figuring it out.
In this example I have the MOD_MissionRandomizer_InfoPasser spawned either on host or on client, I kept them separate so it would assign different owners depending but really you should be able to do it before the server check branch node since the client and server both need it.
Replicated variables used for passing info are limited to "core" variables to some extent, so - bool, int, int64, float, string, etcetera.
When it comes to replicated actors everything should replicate if the actor is set to, but passing info from one system to another seems limited from what I recall (could be wrong, have not tested).
Info Passer Logic
What we first want to do is make a brand new, empty actor unrelated to anything vanilla and make it replicate via enabling Always Relevant, Replicates.
This custom actor will serve as our "info passer" and everything game data related that needs to be passed will be done through this.
So now that we have an Info Passer actor that has replicated and always relevant enabled on it, make it spawned on the server and on the client; the host can now receive it on the network from the client and allow the server to alter the clients actor.
Here is an example of how I use the Info Passer for Mission Content Randomizer:


So, I designed this in a way in which the client spawned Info Passer does not do anything on its own as it always fails the server check so it never assigns the server variable info with data from the client.
However, the host spawned version does because each of those "server" variables are replicated so all instances of that Info Passer actor will sync their data when told to do so via this Multicast event.
Variables that are replicated have two white balls when viewed as a reference in the event graph.
Notice that all of the "client" variables are not replicated:

The "server" variables are replicated. There is no need for an Is Server node like in the screenshot below because this data comes from the host and is applied to the host and client.
I just use it for less data changing for the host.

This part is important! - Events can be assigned Multicast, Run On Server, Run On Owning Client and then Reliable or not:

A breakdown of the settings:
Multicastis designed for running an event on the server and client(s).Run On Serveris designed for a server only event such as spawning an actor via event.Run On Owning Clientis designed for client only logic such as particles, animations, sounds.
This will still act as a server event if the owning client is the server though, so I would recommend using it exclusively in a client variant of a logic actor or a simpleIs Authoritycheck and running off of false so the server will never do it.Reliableis an interesting topic for game development (not really applicable for modding), it is essentially like a "is this event so important that it should ALWAYS be passed on the network?", the more things that have this the more stuff that is being sent on the network so it can cause latency issues and such.
A good example of this is damaging players - you don't want clients to be able to skip damage instances while the network load is heavy, but a particle from an environmental piece somewhere? Nah, not important.
Generally speaking for modding you are always good to set it to true for reliability. BUT! If you got into a really complex mod such as my Mission Content Randomizer where you need to sync a lot of data you will encounter a problem with events, they have a limit of how many inputs and outputs (or maybe that was only for delegates).
Either way, a neat thing you can do is create a Structure in UE and assign variables with specific names and types of variables that you want to pass to clients.
Then you use that Structure for the input and output of the event. This will allow you to pass ONE variable that acts like a box, you open that box and take the contents out (different variables):


I get all of my replicated "server" variables and turn them into a Client Data Structure variable and pass it via the event call.
The Structure is then split on that event to set data for individual data assets on the client as I cannot pass it all at once into a single node:

Now that we have general explanations out of the way, let's try with a basic example that MichaelG123 runs you through.
Approved replication (written by MichaelG123)
There are 4 main actors that we need:
InitCaveInitSpacerigMasterActorReplicatedActor
I'll be referring to them by these names, but in your case you might want to change them to something that makes more sense for your mod.
You can think of MasterActor as the actor that you'll be using to interact with the server, and it handles spawning for ReplicatedActor. It's used for server-based things like changing terrain, spawning bugs, etc.ReplicatedActor is where you handle any clientside stuff such as going into 3rd person mode, spawning widgets, or preparing variables to send to MasterActor, and is usually where most of your code will end up.
Setup
Setting up InitCave and InitSpacerig are simple, just make them spawn MasterActor:

ReplicatedActor is simple to set up. First, you need to click Class Defaults near the top of the screen, and change the replication settings to this:

Still in ReplicatedActor, create a new variable and set its type to your MasterActor. Also make sure to enable Instance Editable and Expose on Spawn:

Now we need to setup MasterActor. First, create a function called something like Spawn Replicated Actor Per Player and add a new input of type FSDPlayer Controller to it. Then create a Spawn Actor from Class node and have it spawn ReplicatedActor like this:

Create a function called Subscribe to Player Join. Add a new input of type FSDGame Mode to Subscribe to Player Join. Inside the function, drag off of the FSDGameMode pin and create a Bind event to On Player Logged In. Drag off of the event pin in that function and select Create Event. Then select Spawn Replicated Actor Per Player from the list so that the function looks like this:

Now we need to run our functions, if the actor is the server:

Creating the mod
For everything you see here, I’ll be using examples from a couple of my mods - you can get the source code for a poke around here.
For any event that you’d like to have the client run, just put everything inside the logic inside of the ReplicatedActor. For example, if you want to play music for only for the client, I have this set up:

You can just call this from wherever you want, nothing special going on here. The different part comes when you’d want the server to do something (spawn things, destroy terrain, apply status effects, basically anything that everyone sees happen at the same time). Here, we need to make "twin" events, one in MasterActor and one in ReplicatedActor. This is what I have in MasterActor, because it’s up to the server to tell everyone to spawn the sound. Make sure you make pins for everything that you’ll need. Your MasterActor events should all be set to Multicast.


MasterActor events are called by their “twin” event in ReplicatedActor. Create a new event in ReplicatedActor and set its replication setting to Run on Server, create pins that match the pins in the MasterActor event, and just plug all of the pins from one into pins of the other.

And that should be everything. You can repeat this event process as many times as you’d like and everything should work out.
5. Dummy method
I'm going to run through making a couple of mods which utilise some of the C++ and dummy methods. Once you know how the basics work, you are then set to much more easily be able to experiment, test, and implement any of your own features that use any of the game's functions and BPs for your mods. The possibilities here are endless. Overview of the two example mods I will step-through in this tutorial:
- Kill player on button press.
- Self-destruct Bosco from a button press.
Both examples will still feature info on how to look at the C++ header dumps.
The very first thing you need to do is download and build the FSD Template project. This has all of the C++ classes automatically reflected in the project source. This saves modders a LOT of time, as there are thousands of classes!
Then you will also need the latest version's dumps from here. You will need to download a text editor or code viewer such as Visual Studio Code to view and navigate the dumps (I use CLion).
Kill player on button press
Scouting the C++ header dumps
Now, you will notice that there are a LOT of C++ classes in the dumps. Don't be overwhelmed – most of the main functions you will need are in FSD.hpp (although saying that, the file alone is 20k lines). If you need C++ from another class you know at the time what you are looking for – and if you don't, you can always search for key words that you are looking for and look through those files. You will be doing a lot of searching through files anyway, so you'll get good at this pretty quickly. Don't hesitate to ask in #mod-chat in the Discord where stuff might be located though.
So, back to this mod example. We need to find the function in the game that deals with killing the player. As you should always do, start by looking in FSD.hpp as it is most likely to be there. Do Ctrl + F to open the search function (this is the same for all IDEs and code editors), and type Kill. You may see about 100 results. You could look through these manually, OR, you could try toggling on "match by word" option that most IDEs and code editors have. In CLion, it is a square button with a "W" on it.

![]()
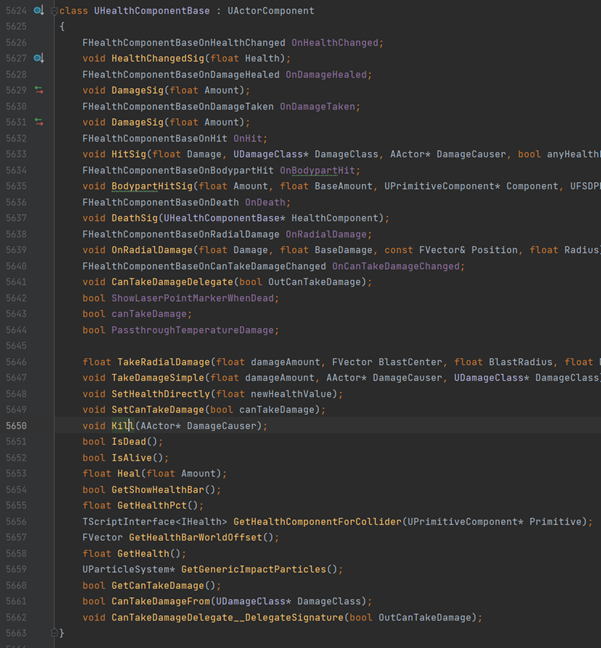
So, here is a function that just kills the player when it is called. An AActor object is passed through but you can just ignore that as we don't need it. The important thing to do here is to check what class this function is inside. This is again relevant for any other functions you will find for your mods. So here, Kill() is inside struct UHealthComponentBase, which is a child class of UActorComponent, as denoted by the :.

When you are looking for functions and variables for your mod, you will come across some really interesting looking functions and variables. I have regularly come up with entire mod ideas just from being distracted when looking through the code. Every single function and variable in all these header files can be dummied… which is a lot of possibilities. Feel free to go wild!
Accessing the C++
Now we know where our Kill function is, we can go about accessing it from our BP mod. Make a new mod (I just made a new one in my tutorial folder and changed the InitSpacerig and InitCave to spawn that instead).
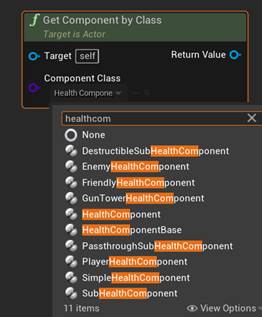
Inside your mod, right click and get a node called Get Component by Class. In the dropdown, you should be able to find the HealthComponentBase class:

Then if you drag off the return value pin and type Kill, you should see a function that pops up called Kill. This is your function that you created inside the HealthComponentBase C++.

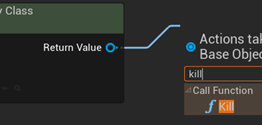
Now when we press a key, say, the period, we want to kill the player:

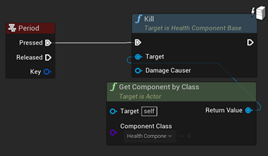
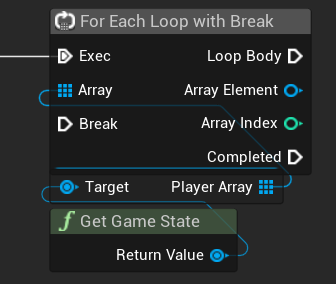
There is a problem with this though! You cannot just call the Kill player function, as you will notice that the component by class node requires a target, which will be the player to kill.
To get the player you want to kill, we need to get the game state player array, loop through that player array then cast the array elements to BP_PlayerCharacter pawns, which you can then use as the targets.
Dummying player character BP
But what is BP_PlayerCharacter? This is a blueprint class that the game has that controls all the logic for the player. We need to dummy this in order for our killing player to work.
In the dumps, navigate to APlayerCharacter : ACharacter. You will see that this is where all the info about the player is stored. ACharacter inherits from APawn, which inherits from AActor. This is important to know because when you dummy blueprints, you can set the parent to be super parent (i.e. the highest in the hierarchy).
Create a folder inside Content called Character. Here we are recreating the exact file path of the asset (you can find BP_PlayerCharacter inside of your unpacked files at this location). Now you need to create a new blueprint class called BP_PlayerCharacter. Inherit it from PlayerCharacter.
Once you create this blueprint, you don't need to do anything with it. Since we aren't dummying this file, we don't want to overwrite anything in the game with it so that is why we don't change any values. All we are doing is accessing the REFERENCE to the blueprint for the mod.
Now, back in your mod, let's get to work on this logic.
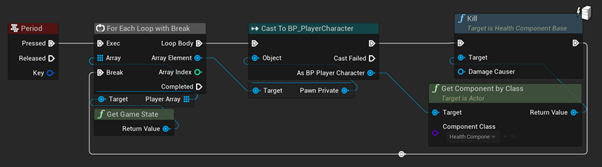
First, there is a node from the UE base Gameplay Statistics library called Get Game State. Drag off the return value and type Player Array; we want to get that. Then drag off player array and create For Each Loop with Break node. This will loop through all players in the player array and stop when it receives the break call. If you are in a multiplayer server, all the players in the game will be registered in this player array. So, if you just use a for each without a break, you could kill all the players in the game, if you wanted. This cluster of nodes will be very useful for your mods.

Now drag off the loop's array element and type Pawn Private. Then from the output of that read node, type Cast To BP_PlayerCharacter. Connect the execution node for that cast into the loop body.

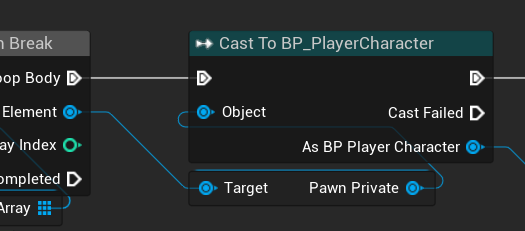
Now plug in your Kill function execution node, and your target from As BP Player Character from the cast. Then, if you want to kill just the first player in the player array, hook up the end of the kill function execution to the break for the for each loop with break node. You don't have to do that though, as mentioned above.

Make sure that you enable input on BeginPlay!


Before you package your mod, you have to make sure that you set your directories to never cook to include the Character folder. This is because if we pack our dummied BP_PlayerCharacter, the game will crash. This is explained in section 6, packaging your mod.
Self-destruct Bosco on button press
Scouting the C++ header dumps
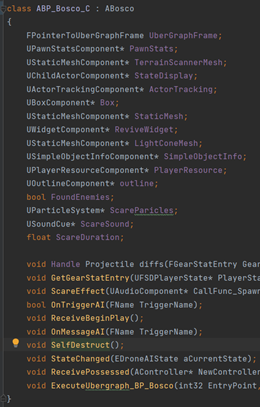
First off, we want to find BP_Bosco in the header dumps. It is nicely called BP_Bosco.h. You will see a function called SelfDestruct() inside of it.

If you go into FSD.hpp, and search for ABosco (which is what this class inherits from), you will also see SelfDestruct and a bunch of other functions. Let's say that I also want Bosco to salute before he self-destructs. When writing this tutorial I was just planning on him self-destructing but saw that PlaySalute() function and just knew I had to include it. That'll happen a lot when you are looking through the dumps :)
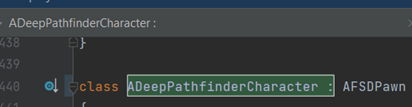
Before we make the dummy blueprint, we need to figure out what class it needs to inherit from. So, if you look at the struct ABosco line, you will see a :, which as described previously, means "inherits from", then the class it inherits from to the right. So here we see that ABosco inherits from ADeepPathfinderCharacter.

![]()
If your IDE has the feature, you should be able to just hover over the name and it will tell you what that class inherits from and click to go to the location of it. If not, don't worry, as you can just search the file for that classname manually.

So you will see now that this class is inherited from AFSDPawn. Now we search for what AFSDPawn is inherited from, and we will see APawn.

![]()
APawn is a base UE class so that's as far as we need to go – but now we know, that ABosco is a child class of APawn, even though it is a bit down the inheritance tree.
Creating the dummy BP
Now, we need to recreate a dummy blueprint in the same location where this guy is in the game files, like we do for hex mods. So in your unpacked files, search for BP_Bosco. It should be inside Content\GameElements\Drone.
Inside your project files, navigate to that file location and create a new blueprint class. Since we discovered that ABosco is a child class of Pawn, we can select Pawn class to inherit from. We name the blueprint BP_Bosco. It should look like this:


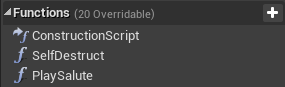
Inside of this, all we have to do, is create two functions, one called SelfDestruct, and another called PlaySalute. That is literally all you have to do. This now allows us to call these functions without having to touch any C++.

Now, to call on our blueprint, all we have to do is create a node Get Actor of Class and select BP_Bosco in the little dropdown. Then drag off the return value and type Play Salute.

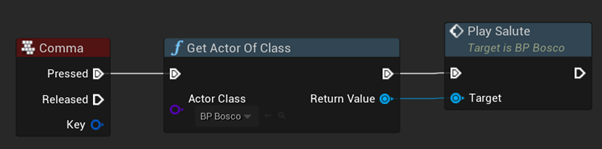
Now, let's put a short delay between saluting and self-destructing, and then call the self-destruct function.


6. Packaging your mod
When you want to test your mod, there are two options for packing:
- Automatically using DRGModdingAutomationScripts that Samamstar and DrTurtle made. I really highly recommend using this as it saves a LOT of manual time!
- Manually from UE then using
DRGPacker.
There's also directories to never cook, which is an extremely important setting, so make sure you scroll down to read that part too.
For either method, if you are getting a game crash on launch that looks like this:
Error: AddAssetData called with ObjectPath /some/path/ which already exists. This will overwrite and leak the existing AssetData.
Error: AddAssetData called...
...
...
[2023.05.13-21.27.01:936][ 0]LogCompression: Error: FCompression::UncompressMemory - Failed to uncompress memory (3103/9686) from address 000002672E4A73C0 using format LZ4, this may indicate the asset is corrupt!
Then you need to go into packaging settings and uncheck Share Material Shader Code.
Using DRG Modding Automation Scripts
First head to this GitHub repository. Then hit the big green Code dropdown and download the code using your preferred method (e.g. download as ZIP). Then extract the DRGModdingAutomationScripts folder and follow the instructions on its README file. Once you are setup, all you need to do is double click a .bat and it'll do whatever the bat says it does in the README.
From UE
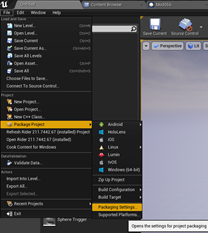
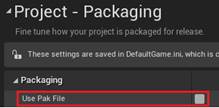
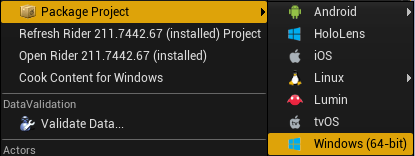
Go into the Untitled tab. Click File -> Package Project -> Packaging Settings.

Make sure that this Use Pak File option is off.


Now, package your project by clicking File -> Package Project -> Windows (64-bit).

Then selecting a folder to package to:

Tip: if you already have an old cooked folder in there, delete it then click on the parent folder again in the top bar. Because otherwise, since you selected the old folder, it will cook into WindowsNoEditor again, even though you deleted the old one. This sounds confusing so if you just try it yourself you'll understand what I mean.
Assuming you didn't do anything wrong, your project should package after about 30 seconds (differs on how large your project is - when using the FSD-Template, the first time around takes many minutes).
Now, navigate to the packaged files and delete any stuff you don't want to pak (other mods etc.).

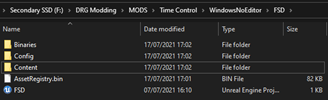
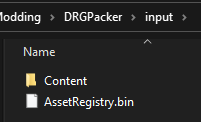
Now copy both the Content AND AssetRegistry.bin files, and put them into the input folder inside your DRGPacker.


Then drag the input folder into _Repack.bat. Remember to rename the .pak to your mod name. Then navigate to DeepRockGalactic\FSD\Mods\ and make a new folder with the same name as your mod. Then put the .pak into that folder.
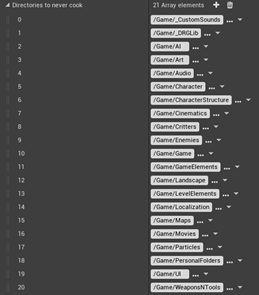
Directories to never cook
You can set directories to never package, which is useful when you don't want to pack say, any of the dummy BP folders. Although you don't have to do this, it does mean that you don't have to delete these files manually within the cooked files, every time. To do this, click the little dropdown arrow in package settings, just above the Project tab:


Then in directories to never cook, press the + button to add directories to the array. This is what mine currently looks like:

More Help
- codertrevor has created his own blueprint modding guide with some really great examples to run through: https://codertrevor.github.io/DRG-Modding-Tutorials/
- There are some forum posts in the modding discord that you can follow/ask questions in about misc questions people have had, e.g. "First BP Experience"
- The #learn-blueprints channel in the modding discord has some nice snippets of blueprints that you may find yourself needing
Video Tutorial
Tutorials playlist
Important announcement: these video guides are now very out of date, with methods inside still working but newer, less tedious methods now exist. I suggest that you follow this written guide first.
Created by myself, featuring a segment recorded by Samamstar and edited by Hand Drawn Nerd, this guide aims to walk people through the complex process of BP Modding!
These videos are not intended to replace the written guide.
The segments recorded include:
- Introduction info and setting up your workspace
- The basics of setting up native spawning, native spawning with DRGLib & pre-native spawning with BPMM
- The no-dummy BP modding method, using the pre-native BPMM method and then converting the same mod to native using BPMM's interface
- The dummy BP modding method, which includes how to navigate the C++ header dumps, as well as reflect them and dummy BPs
- Reflection demo, which shows exactly how to reflect some certain C++ objects/delegates/functions/properties that weren't covered in episode 4
Feedback
Hello modder! If you found this guide useful, I invite you to rate it in this form. Feedback is optional, but very welcome.
Audio Modding Guide
DRG Mods: A Comprehensive Guide to Audio Modding
Please do not hesitate to ask for help! You can find talented modders in the DRG RND Discord or the DRG Modder's Guild Discord.
Credits:
Buckminsterfullerene - Originally wrote and maintains guide.
Kraeus - Helping out with knowledge tidbits.
Dr Turtle - Typo/grammar/link fix pass, rewrote replacing axe impact sounds section.
Watch this video guide while reading the written guide for extra information!
Contents
- 1. Introduction
- Tools
- Reading this guide
- Types of audio mods
- Pre-requisites
- Audio mods filename prefixes
- 2. Using the Audio Modding Template
- 3. Replacing cues method
- Replaces axe throw sound
- Adding new boss music with custom tracks
- Volume control
- 4. Replacing sounds files method
- Replacing jukebox songs
- Replacing axe impact sound
- 5. Packing your mod
- Using DRGPacker
- Using the new packing method
- 6. Installing your mod
- Why won't my mod auto-verify in-game even though I've set the auto-verify tag?
- 7. Extra notes and help
- Why don't the game sound waves play anything in the all-assets branch of the audio template?
- Why can't I hear anything when I play some cues in-editor using the audio template?
- Windows 10 explorer audio file loading time
- Memorial Hall Cue (thanks Kraeus/KrysPolezoes)
- What is single vs looping cues in Music_Wave?
- Spacerig music cue solution (thanks SASHA)
- Getting help
- Kraeus' Music Breakdown
- Boss
- End Wave
- Level
- Menu
- Special Events
- Wave
- Spacerig
- Feedback
1. Introduction
Tools
Before you get started with your mod, you should know about a few tools:
- DRGPacker
- FModel
- Audio Modding Template Project
- EmptyContentHierachy (not really a tool but very useful)
- Unreal Engine
4.27.2(it will look like just 4.27.0 on the epic games launcher, which is good to download)
IMPORTANT: By the time you are reading this guide, you should already have these tools and have at least the minimum required knowledge to use them (more on UE4 later). If not, I refer you to Rauliken's more general guide.
Reading this guide
Make sure that you read through every detail of this guide thoroughly as missing something may result in many problems down the line. Watch the video guide for easier following along. Of course, you can always refer back to this if you need assistance on anything. Critically important details are highlighted in bold, and optional but useful information is highlighted in italics. Inline code is used for 'specifics'. Also, if you are stuck on something, it may be useful to refer to the random but possibly useful notes at the end.
Types of audio mods
There are two types of audio mods:
- Editing the audio cue files to play new sounds of your own. The cue files have to use the same name and location in the game structure so that they will be loaded by the game. This method is best because it gives you more control of the sounds you are playing, as you can add logic in the blueprinting part (we will get to that later).
- Adding sounds with the same name and location as the original sounds, so the original ones get replaced and the original (untouched) cue file now plays your sounds. This method is much faster than the first but gives you far less control of your sounds.
You can use either method, depending on your situation. If you want to just replace some say, background music, with some of your own, you could use the second method. If you wanted to add new music alongside vanilla music, you would have to use the first method.
Pre-requisites
For either method, you will need your audio files to be in the .wav or .ogg file formats. There are plenty of online audio converters to and from various file formats.
The reason there are two different formats is that there are pros and cons of using either of them:
.wavis around 4x larger in file size; however, it requires very little messing about with volume control..oggis more compact than.wavbut may require gain to be reduced using Audacity (or a similar external program) and output volume to be reduced by ~25% otherwise it may produce horrible audio popping artefacts. Volume control is slightly more difficult (subjective), but that is explained in the Volume control section.
If you're getting audio popping, super low quality, or bass-boosted sort of sounds, then try switching to the other format. It seems like you have to play it by ear for which format you use for every project. Some projects do better with .wav, some better with .ogg.
Audio mods filename prefixes
ST – Soundtrack
MSC – MuSiC
Cue – Sound Cue
UEE – Unreal Engine Editor
2. Using the Audio Modding Template
The audio modding template is a set of files that allows you to skip a lot of manual work when making mods. All of the assets inside of it are generated by some tools developed by the community. This means that they have all of the same properties as if you had the game's original project open.
There are two branches:
- The main branch, which is the default one. The vast majority of audio modders will want to use this branch, as it does not include the sound cues and sound waves, but includes everything else. It means that you just need to make the sound cues yourself, which will be explained later.
- The all-assets branch, which contains every sound asset in the Audio folder in the game, including sound cue graphs and sound waves. Switch to this branch if you want to copy the reconstructed sound cues with the reconstructed node graphs.
You can switch branch by hitting the branch dropdown on the GitHub repository like this:

To download the template, select your desired branch, and then select an option from the green code dropdown (the easiest being download ZIP):

Then to use, just double click the FSD.uproject file (making sure that you have UE installed of course).
If you downloaded the main branch: navigate to your new project in file explorer. Copy the Characters, Music, and SFX folders from inside EmptyContentHierachyU36/Content/Audio (these are the same as the game) and put them inside your project’s Content/Audio folder. It should look something like this:

You don’t have to do this – you could just manually create or copy the folder structure for only the folders that you plan to use (e.g. in our case the Audio folder). But this makes things nice and simple for you as it reduces manual labour.
Add a new folder within Content called _<your mod name>. For this tutorial I'll use _CustomSounds. Whatever you call it, do not forgot to have an underscore at the start of the name. The underscored files are always at the top of the content browser for ease of use, so that is where you can store the sounds that will be used in the audio cue files. They are also scanned by mod.io for assets that help determine the auto-verified tag.
3. Replacing cues method
I'm now going to show you 2 different examples within this method (as they require slightly different processes):
- Replacing the impact axe throw sound with a custom one
- Adding new boss music with custom tracks alongside the vanilla ones
Replacing axe throw sound
Making the cue
For this example, use the main branch project from the audio modding template.
First select and download any sound effect of your choice that fits what you want, from the internet. Make sure it’s in the .wav or .ogg formats. I went with a cry for pain sound. Place it into the _CustomSounds (or whatever you called it) folder within your project – the filename does not matter.
If you have the project open when you do this, a little window should pop up in the bottom right corner asking if you wish to import the file:
![]()
Click Import. This will automatically create a paired .uasset file.
If the import window does not show, click the big green "Import" button on the content browser and do it manually that way.
Next, you need to create the cue file with the same name and location as the AxeGrenadeFoldOut_Cue file. If you look through the game’s unpacked files, you should find AxeGrenadeFoldOut_Cue in Content\Audio\SFX\WeaponsNTools\ITM_Grenades\AxeGrenade – it should look like this:

Side note: when looking for other files, generally you have to use a bit of common sense to find them. However, even that is not enough, as the game’s file naming conventions are practically non-existent – some files are named in really, really dumb ways that make them hard to locate. If you have any experience of other modding types, you will understand what I mean.
So now back within your UEE project, navigate to the right file location in the file explorer. Then, right-click, go down to sounds, and click sound cue:

You need to name this file exactly the same as the cue you are changing, e.g. in this example AxeGrenadeFoldOut_Cue.
Just to check, your content browser should look like this:

Double click the sound cue you just made. It should open a new window in an audio blueprint editor.

To add the custom sound, you can either navigate to the _CustomSounds folder and drag the sound in, or you can add a Wave Player node and in details (click on it), select your sound.

The most basic thing you can do here is directly connecting the Wave Player node to the Output node.

This works if you press Play Cue in the editor, however, with very little effort you can do a lot better.
Side note: if your sound effect produces weird audio artefacts (like crackling) even within UEE when you hit the Play Cue button, you will need to manually go into a program like Audacity and reduce the amplification (Google how to do that if unsure; it is very simple to do). This can either happen if you are using the wrong audio format (make sure you are using .wav or .ogg!) or if the audio amplification is too high for UEE.
Setting soundclass/attenuation/submix references in your cue
If you click on the Output node, you will see in the details pane that you need to select a Sound Class, an Attenuation and a Base Submix to inherit from. If you click the little drop-down box for each, you will see all of the assets inside of our project already - this is due to our template project already having these inside for you to use instantly!

Because the game's file naming convention is practically non-existent, it may not be clear which to use in your mod. This is where FModel comes in. You can download it from here.
To use FModel, open it up and hit the Directory button in the top right, then Selector.

A window will pop up and you should enter your DRG install path. FModel will then detect all the Pak files inside it. You can then select FSD-WindowsNoEditor.pak and hit Load.
Now, navigate through the folder dropdowns to the Content\Audio\SFX\WeaponsNTools\ITM_Grenades\AxeGrenade folder. You will see that one of the tabs at the top will say “3 Packages”; click on that, and you will see the 3 cue files. Double click on the AxeGrenadeFoldOut_Cue.uasset.

Now, this JSON gives us some details about the cue. The bit we care the most about, however, is this part:

It tells us:
- The sound class that it uses is called
ExplosionsManualMix - The attenuation that it uses is called
DistantWide_Misc_Attenuation_Cue - The submix that it uses is called
GeneralWeaponsToolsSubmix
Make sure you select these assets in the drop-down on the cue. So now you know how to find out which assets any of the cues you are replacing use.

So now, you should have a programmed cue file! There are some other nodes you can use, like random and modulator, but I will explain those in a later example.
Make sure you hit save or Ctrl+S!
You need to do volume control on your mod to make sure that the sound levels seem about right, which means getting into a game and playtesting!
Refer to section 5 on packing your mod to finish up.
Adding new boss music with custom tracks
Making the cues
For this section, I highly recommend downloading the all-assetsbranch from the audio modding template, and then copying in the specific files that you need for your mod into your existing project (simple copy and paste via file explorer works fine here).
If you plan on making any type of music mod, please go to section 5 on Kraeus’ music breakdown. There, he lays out the associations between the music cues, audio files, and song names. If you don’t look at this, you will likely struggle. Alternately, you can open it separately here.
Now, we are going to add boss music. Download any music of your choice, again in the .wav or .ogg file formats. Place these tracks (as many as you would like) into the _CustomSounds folder like before. It is important to note that because this example is adding custom music on top of vanilla music, but we are replacing cue files, we will also need to get referemces to the vanilla music.
Therefore, what we can do, is - making sure that we have UE closed for this - copy in the 3 cues and the entire AudioFiles folder from Content/Audio/Music/Boss folder from the all-assets branch on the audio modding template, to the same locations in our own project. We also need to copy in the entire Content/Audio/SoundControl folder if you haven't already got it in your project. This contains all the sound classes, attenuations, etc.

The reason that there are 3 cue files, is that there is one for each track. The reason that GSG uses one song per Cue is so everyone hears the same song. With Random nodes in our Cues, we all hear the same Cue but the song we hear is random per each client. So there is no guaranteed song parity. When you have multiple cue files, there are 2 ways of using them (in this example):
- Put one vanilla track in each, and then split your custom tracks between the 3 cues. I will explain how to combine them a bit further on.
- Put everything in one cue, and then just copy and paste everything inside the first cue into the others. That way, you only have to make changes in the first and just copy and paste into the others without having to match in each. This is super time-saving when working in other cue types (e.g. wave music) that may have 10 or more cues. We will use this option.
Open one of the cue files, say St_Boss_Music_Cue. Inside this, first, you want to drag in the new sounds that you want to play. Since we will be going with the 2nd method, chuck everything in and set them to looping (most music cues by default have looping wave players), like this:

To connect these, but only have one play at once, you can use the random node. You can add more inputs by clicking the “Add input” plus symbol on the node. Now, just connect the tracks to the input, and the output on the random node to the Output node, like this:

You can see that, since we copied the sound cues from the audio modding template, they already have their sound class and submix references set. Music cues don't have attenuation because of course they are global sounds - no matter where in the world you are listening from, the volume should stay the same.
Now, copy and paste these nodes into the other 2 boss cues, making sure you hook up the random node to the output node in the cues.
You need to do volume control on your mod to make sure that the sound levels seem about right, which means getting into a game and playtesting!
Packaging
When you go to package this mod and test it in-game, you will probably notice that it sometimes plays silence or never plays the vanilla tracks. This is because we haven't explicitly told UE to not package the dummy sound waves inside of the AudioFiles folder. So when the mod is being loaded into the game, it's replacing the vanilla boss tracks with empty ones, which is no good.
So, make sure that in the Directories To Never Cook setting explained in the packaging your mod section, you need to add the Audio/Music/Boss/AudioFiles folder to that list. That way, when your mod is packaged, it leaves out the dummy files, like the sound control ones. Make sure that you remember to do this for any mod that makes references to dummied vanilla sound waves! It's nice and handy that the devs usually put the sound waves in a seperate AudioFiles folder meaning that you can do this easily. However, if the sound waves are in the same directory as the cues, then you'll have to manually delete the sound waves after packaging from UE.
Refer to section 5 on packing your mod to finish up.
Volume control
When testing either of these methods, it may come apparent that some sounds are too loud whilst some are too quiet. So, there are few methods for volume control that do the same thing:
- Modulator node method
- Audio file modulating method
- Just changing the overall volume multiplier in the main sound cue settings (self-explanatory)
Modulator node method
Of course, you could go into the individual sound files and adjust them manually in Audacity or something. But that could get very time-consuming very quickly (if you have many audio files), and there is a much better way of doing it. Modulator nodes!
The modulator node allows you to change the minimum and maximum pitch and volume of the input sound. So, say you want the volume of a specific track to be twice as loud, you can set the min and max volume to 2. For twice as quiet, you’d want 0.5. I haven’t messed with changing min and max to different values and seeing if they actually work, so feel free to mess with them yourself.
So, to use the Modulator nodes, just place them between the Wave Player nodes and the Random node, like this:

Audio file modulating method
This is basically another form of the previous method. Instead of changing the volumes inside the cues, you can just change output volume from the actual sounds themselves. If you don’t know how to do that; you can double-click on an audio file, and it will display volume, pitch, and other settings. It has its own built-in modulator. This method is good if you use the same audio file in many different places unless you want it to have different volumes or pitches in the different places, as you would need to use modulators inside the cues anyway.
4. Replacing sounds files method
For this method, you will need your replacement audio files to be in the .ogg or .wav format, with the same pros and cons that came with the previous method. You will still need UEE for this.
Set up a new project using the main branch from the audio modding template, as you would in the previous method.
I’m going to go through and explain 2 examples as they differ slightly:
- Replacing a jukebox song with a custom one
- Replacing the axe impact sound
Replacing jukebox songs
Download the audio you want to replace in the, again, .ogg or .wav format. Locate the location and name of the jukebox song(s) you wish to replace. For example, let’s replace the Jukebox_Blues_TheBluesSchool song with our own. This is located in Content\Audio\Music\JukeBox.
There are some other folders with even more songs in, like NewMusic and NewMusic_june2020 which is blatantly rubbish file naming/organization. However, the TRJMusic folder contains all of the non-copyrighted music provided when you check the streamer mode box in-game.
Get your song, and import it into your UEE project, into that location, naming it the same as the file you wish to replace. Earthcomputer wrote a script that renames all your jukebox replacement songs automatically, which can turn 10-20 mins into 30 seconds (if you know how to use Python). You can find that here.

There is a bit of volume control you can do. You can use the same method as the audio file modulating method, but basically, you can double click an audio file and edit its volume. I’ve found that I tend to set the volumes to 1.5 or 2 when downloading songs from YouTube to .wav. You’ll find that different volumes work for different things anyway.

And you’re done! Refer to section 5 on packing your mod to finish up.
There is no way of using method 1 to change jukebox songs, as there are no actual cues for it in the unpacked game files (the files Jukebox_Cue are for the dwarf voice lines when you start the jukebox). You will notice that this is a recurring theme for some other sounds. You can use BP modding as there is a blueprint which does Jukebox stuff, but that's far too out of scope for this guide.
Replacing axe impact sound
The reason that this is a separate example from the one above, is that for some game elements like weapons and tools, one of several similar audio files is selected at random by the cue. This is likely to prevent the same cues from sounding unnaturally identical. To keep things simple, you can just use the same file for each.
So, for the files in Content\Audio\SFX\WeaponsNTools\ITM_Grenades\AxeGrenade\AxeGrenadeImpactCombined, there are 10 files.

So, when you replace them, you also need to duplicate your replacement file, and rename each of them to the names of the files you're replacing, in this case, AxeGrenadeCombined_01.ogg, AxeGrenadeCombined_02.ogg, etc. (uasset files are generated when the audio files are imported, and uexp files are generated upon packaging).
To test if UE4 is properly playing your audio files (sometimes issues will only be present when played in UEE/in-game but not in the original file), add a single file first, then play it. If crackling, popping, and/or other issues occur, try using the methods described here.
Once you test your mod in-game (see Packing your mod), you will probably need to adjust the volume or other settings. To adjust every file's settings at once, select the first file in UE, hold shift and select the last one, then right-click and select edit.
5. Packing your mod
There are 2 ways to pack your mod:
- Using
DRGPacker. If you already know how to use it and how it works, that’s fine. But many of you reading this section have chosen to ignore the call to read the general guide and so tend to not understand howDRGPackerworks at all. This has been causing a lot of problems for us so please, PLEASE, PLEASE, read the general guide explaining how to useDRGPackerbefore you read this section! - Using an “experimental” (despite being in the engine for years) UE auto-packing will pack your selected files automatically.
Using DRGPacker
Now, you need to pack your mod. Before you skip this step, you need to pack your mod from UEE first, then in the DRGPacker. To pack your mod in UEE, first, you need to navigate to the editor tab (called Untitled) and click File > Package Project > Packaging Settings:

You need to uncheck the Use Pak File setting, so make sure that it is unchecked when you create every audio project.

Also, click on the little arrow also marked by the red box at the bottom of the above image. This will pull down a bunch of new settings. Scroll down to the bottom of these settings and find the section that says Directories to never cook. This setting is very important, as it allows you to select folders to not get packaged. It is absolutely imperetive that you make sure the following directory is set to never cook, otherwise your mod WILL cause unintentional behaviour with other sounds in the game:

You may add other folders if you are not using them for your current mod and they have assets inside of them (as you wouldn't want to replace other assets that are not included in your mod!).
Now go to File > Package Project > Windows > Windows (64-bit). Select the folder you wish to put the packed project into. Give it a couple of minutes, and it should be done!
Next, navigate to the packed project in your file explorer. Go to WindowsNoEditor/FSD/ and copy the Content folder. Then, paste it into the input folder in your DRGPacker, and pack it. Because some of you twits somehow missed all of the warnings from me telling you to read the general guide on how to use DRGPacker, here's how you do it:
- Copy your
Contentfolder into yourinputfolder (the name of the folder is the name of the created pak file, which is why I suggest naming it with _P). - Drag and drop the input folder onto
_Repack.bat

Using the alternate packing method
Theoretically it should be a lot easier and a lot quicker for you, however it seems that a lot of people find this confusing and so I moved it to the archived guide section because for some reason it seems to be more difficult than I thought. So I don't recommend using this over the above method. But if you're interested, I wrote a mini-guide on how to use this packing method here.
6. Installing your mod
Since the mod.io integration, there are two ways of installing your mod for testing:
- Navigate to the
Paksfolder in your DRG install. Then place your.pakinto it, making sure that the name of your.pakends with_Potherwise the game will NOT load it. Inside the modding menu, the game will mark your mod asDEPRECIATED– this is fine, it will still load the mod although will force you into a sandbox save to test it. This is the best way to test your audio mods because it’s quick and easy and doesn’t require any hassle! - You can make hidden mods on mod.io which will be sandbox by default, but you can then add friends as “moderators” or “testers” in the mod settings so that they can subscribe to it and test it in-game with you.
Once you are happy with your mod, you can upload a public version to mod.io! When you upload to mod.io, you need to send the .pak to .zip and upload that.
This is VERY important: for audio mods, you MUST NOT select a requested category, as the game will automatically tag it as auto-verified if it detects that your mod only changes audio files! Then you can select the “auto-verified” type on the mod. This was implemented to save mods having to wait to be verified and to save the devs from spending so much time verifying mods.
Why won't my mod auto-verify in-game even though I've set the auto-verify tag?
Everytime I've seen an audio mod not verify in-game, it's because the mod author hasn't followed the guide when it tells you to delete the dummied sound control files. If these files are not deleted from your pak file, your mod will not auto-verify in-game! Example assets:

How do I check exactly which files won't auto-verify?
There is a handy tool called mod_lint, which you can see how to use in section 2.3 of the basic modding guide. As shown in the screenshot above, any files that say "no" means the mod will not auto-verify in-game.
7. Extra notes and help
Here's some random info that may be useful for you when making audio mods.
Why don't the game sound waves play anything in the all-assets branch of the audio template?
This happens 95% of the time due to the sound waves being cooked assets imported into the editor. Since you aren't going to be cooking these assets, it doesn't cause any problems. They are purely in the project for reference, as are all the other assets.
If you wish to listen to the original game sound waves, you can either:
- Open the sound in FModel
- Listen to any voice line in-game using the shout framework mod.
Alternately, for more advanced users, you can reimport the cooked sound waves into the editor by closing UE, then copying in the cooked waves from the unpacked game files and overwriting the ones that are already there (you need both the .uasset and .uexp files). This should work for you for most circumstances, but only for that project.
Why can't I hear anything when I play some cues in-editor using the audio template?
Firstly, check that the sound wave asset itself plays. If it doesn't, check the section above this. If it does, continue reading this section.
When you play a sound cue in the editor, it will take into account any of the attached settings to the cue, such as sound class, submix, etc. Since most of the cues have these attached settings, and the settings control what the audio cue sounds like based on parameters in the game, many of them are by default set to volume 0 or not to play in the editor. There isn't really anything I can do to change this as some people are silly and miss the part about not packaging the sound control folder in their mods, so if they had the wrong settings they could very well mess up the audio for the whole game without realising it.
The solution, is to open the sound cue file, click on the sound wave node you want to play, and click "play node" at the top. If you have a big cue with multiple sound waves, modulators, delays, etc. that you need to test easily, then you can temporarily remove the sound control files from the cue.
Windows 10 explorer audio file loading time
With default settings in windows 10, audio files will slowly load the information about each one. To fix this, open control panel > indexing options > advanced > file types and unckeck ogg and wav. If this doesn't work, uninstall web media extensions.
Memorial Hall Cue (thanks Kraeus/KrysPolezoes)
The cue for the Memorial Hall music isn’t in the same place as others in the spacerig. It is called St_Googbye_SpaceRig_Cue in Music/Levels. This is how you should set up your attenuation so that it only plays in that room:

What is single vs looping cues in Music_Wave?
Single cues play once and then the queue moves it onto the next song, and looping plays the song until the wave has ended. In your looping cues, just duplicate the single cues but click on the wave player node and check Looping. The Wave player node should change to Looping wave player or similar.
Looping cue but different song (thanks SASHA)
If you're using a random node with Looping wave players, you might run into a minor issue where the same song plays on loop when the cue is playing for a long time. To fix this, you can put a Looping node between the Random and Output nodes, making sure that your Wave players are not set to Looping themselves.

Getting help
If you need any extra help, feel free to ask in the #mod-chat channel. Please do tag me (Buckminsterfullerene#6666) or one of the other audio mod authors, such as Kraeus#9233. Kraeus is especially good to ask for finding music cues, as he figured out where all of them are.
If you have had headaches when audio modding certain parts of the game, that require special attention, contact me so I can get it added to the guide.
Kraeus' Music Breakdown
Boss
Plays during:
- Elimination Boss Battles
SoundClass for Cues: Music_Boss
Files:
- St_Boss_Music_Cue → St_Nova_Master_1 → Horrors of Hoxxes
- St_InsterstellarNightmares_Cue → ST_InterstellarNightmares_Master_3 → Interstellar Nightmares
- St_Stalker_Cue → St_Stalker_Master_1 → Fighting the Shadows
End Wave
Plays during:
- Mining, Egg Hunt, Escort, and Elimination during the escape to the DropPod.
- Refining – once 100% is reached.
- Salvage – during both point defenses, 2nd point defense song continues until the DropPod leaves.
- Extraction – during the wait for DropPod until the DropPod leaves.
- ST_Action_Master_1 – Stat screen song is used by St_EndMission_Completed_Cue in Music_Menu Folder. OST Song is Beneath the Crust.
SoundClass for Cues: Music_Endwave
Files:
- St_Marching_Edited_A_2_Cue → St_Marching_Master_1 → Leave No Dwarf Behind
- St_OperasFascination_Cue → ST_OperasFascination_Master_3 → Follow Molly
- St_RobotGetAway_EditedA_01_Cue → St_RobotGetaway_Master_1 → Robot Getaway
- St_SabotageOfMolly_Cue → ST_SabotageOfMolly_Master_3 → I Welcome the Darkness
- St_SW_Edited_A_01_Cue → St_SW_Master_1 → March of the Brave
- St_WhereTheyReallyDare_Cue → ST_WhereTheyReallyDare_Master_3 → The Last Ascent
Other Files:
- St_Action_Edited_B_3 – Not sure if in use. Is the same as ST_Action_Master_1
Level
Plays during:
- Ambient Level music during all missions (not SpaceRig)
- LoadingScreenMusic_Cue is played while loading a mission.
- St_Goodbye_SpaceRig_Cue is played in Memorial Hall only.
SoundClass for Cues: Music_Background except St_Goodbye_SpaceRig_Cue is Music_MemorialHall
Files:
- LoadingScreenMusic_Cue → St_Deep_Master_1 → The Descent
- St_Alien_Cue → St_Alien_Master_1 → Fathomless Tomb
- St_AxeRunner_Cue → ST_AxeRunner_Master_3 → Let's Go Deeper
- St_Carp_Cue → St_Carp_Master_1 → Into the Abyss
- St_Clutch_Cue → St_Clutch_Master_1 → Karl's End
- St_Cold_Cue → ST_Cold_Master_3 → Absolute Zero
- St_Crawl_Cue → St_Crawl_Master_1 → Coward's Crossing
- St_Deep_Cue → St_Deep_Master_1 → The Descent
- St_Goodbye_SpaceRig_Cue → St_Goodbye_Master_1 → Ode to the Fallen
- St_Horror_Cue → St_Horror_Master_1 → A Matter of Skill and Ammunition
- St_JourneyOfTheProspector_Cue → A_Quiet_Tomb_ST_Master_1 → Journey Of The Prospector
- St_LOTD_Cue –> ST_LOTD_Master_3 → Echoes from the Past
- St_Pod_Cue → St_Pod_Master_1 → Principle of Darkness
- St_Slow_Cue → St_Slow_Master_1 → I am Lost
- St_ST_Cue → St_ST_Master_1 → The Only Way Out is Through
- St_ValleyOfDeath_Cue → ST_ValleyOfDeath_Master_3 → Deceived by Light
Menu
Plays during:
- St_DeepDives_InbetweenScreen_Cue plays between Deep Dive missions.
- St_EndMission_Completed_Cue plays during the Stat Screen after a mission.
SoundClass for Cues: Music_Menu
Files:
- St_DeepDives_InbetweenScreen_Cue → ST_Where_They_Really_DareDLoop_1 → The Last Ascent (Excerpt)
- St_EndMission_Completed_Cue → ST_Action_Master_1 (From AudioFiles in the Level folder) → Beneath the Crust
Other Files:
- DeepDives_InbetweenScreen_Music - Not sure if in use. Is the same as ST_Where_They_Really_DareDLoop_1
Special Events
Plays during:
- ST_GameEventA_Cue plays during Machine Events
- DiscoverMusic_1 is the music played when treasure (Crate or Pack) is found.
SoundClass for Cues: Music_Action and Music_Discovery for the DiscoverMusic_1.
Files:
- ST_GameEventA_Cue → ST_GameEvent_Master_1 → The Core Infuser
- DiscoverMusic_1 is the music played when treasure (Crate or Pack) is found
Other Files:
- ST_GameEventA_4 - Not sure if in use. Is the same as ST_GameEvent_Master_1
Wave
Plays during:
- CueSingle plays during Mission Control announced waves
- CueLooping plays in Refinery during the pumping stage and in Escort during Ommoran when the wave music doesn't stop
SoundClass for Cues: Music_Action
Files:
Single:
- St_Boss_wave_Cue → St_Boss_Master_1 → They're Here!
- St_DOTSA_Cue → ST_DOTSA_Master_3 → Dance of The Dreadnaughts
- St_HoldMyBeard_Cue → St_HoldMyBeard_Master_1 → Hold My Beard
- St_Hole_Cue → St_Hole_Master_1 → The Shadows are Moving
- St_MorkiteIsADancer_Cue → ST_MorkiteIsADancer_Master_3 → Axes Out
- St_MountainBlaster_Cue → ST_MountainBlaster_Master_3 → In the Belly of the Beast
- St_NotTheBees_Cue → ST_NotTheBees_Master_3 → A Distant Terror
- St_SpaceFire_Cue → ST_SpaceFire_Master_3 → RUN!
- St_Tick_Cue → St_Tick_Master_1 → Petrified Fury
- St_Wave_Cue → St_Wave_Master_1 → Attack of the Glyphids
Looping:
- A_Distant_Terror_Looping_Cue → A_Distant_Terror_Looping_01 → A Distant Terror
- Dance_Of_The_Dreadnaught_Looping_Cue → Dance_Of_The_Dreadnaught_Looping_01 → Dance of the Dreadnaught
- MorkiteIsADancer_Looping_1_Cue → MorkiteIsADancer_Looping_1 → Axes Out
- MountainBlaster_Looping_1_Cue → MountainBlaster_Looping_1 → In the Belly of the Beast
- PetrifiedFury_Looping_Cue → PetrifiedFury_Looping_1 → Petrified Fury
- SpaceFire_Looping_1_Cue → SpaceFire_Looping_1 → RUN!
- Theyre_Here_Looping_Cue → Theyre_Here_Looping_1 → They're Here!
Spacerig
Plays during:
- Ambience_Music_Cue is the Ambient SpaceRig Music
- Ambience_Music_Chrsitmas_Cue plays Ambient SpaceRig music during the Christmas Event
- Ambience_Music_DiscoBeer_Cue plays when you drink a Blackreach Blonde
- Ambience_Music_DiscoBeer_Safe_Cue plays when you drink a Blackreach Blonde with Streamer Mode enabled
- Fanfare_promotion_Cue plays in Memorial Hall
- YearTwoFanfare_Cue played during the Year Two reward screen so isn't used anymore (I think)
SoundClass for Cues: Music_Action
- Ambience_Music_Cue and Ambience_Music_Chrsitmas_Cue – Music_Background
- Ambience_Music_DiscoBeer_Cue and Ambience_Music_DiscoBeer_Safe_Cue - Music_BeerEffect
- Fanfare_promotion_Cue – Music_PromotionMenu
Files:
- Ambience_Music_Cue → St_Ambience_Master_1 → The Deep Dive
- Ambience_Music_Chrsitmas_Cue → Christmas Song 4,5,6,8, and 9
- Ambience_Music_DiscoBeer_Cue → JukeBox_Disco_Night_Disco, Jukebox_Techno_di-the-chance-032414-81, and Techno_TRJ_02 in Jukebox
- Ambience_Music_DiscoBeer_Safe_Cue → Techno_TRJ_02 in Jukebox
- Fanfare_promotion_Cue → PromotionFanfare → Might be an excerpt from OST song
Other Files:
- Fanfare 3 and 4 – probably used for Year Celebration reward screens
MINT
Please do not hesitate to ask for help! You can find talented modders in the DRG RND Discord or the DRG Modder’s Guild Discord.
Credits:
许杰友 Jieyou Xu (Joe) - Original documentation
mitgobla (Ben) - Updated 2026 guide
trumank - created MINT and other incredibly powerful modding tools
Contents
- 1. How to install MINT (Mod INTegrator)
- 2. Installation Guide
- 3. Usage Guide
- 4. Frequently Asked Questions/Problems
- 4.1 I get an error when I try to add/update/install mods: “authentication error: Unauthorized: Unauthorized”
- 4.2 I get an error when I try to add/update/install mods: “ureq error: https://cdn.discordapp.com/attachments/…/…/oo2core_9_win64.dll”
- 4.3 I get an error when I try to add a mod: “Could not find mod provider for “https://mod.io/g/drg/m/mod_name#description”
- 5. Guide To-Do
- 6. Questions/Issues/Bugs
1. How to install MINT (Mod INTegrator)
This guide will show you how to install the popular mod manager MINT, created by trumank.
1.1 What is MINT?
MINT, derived from Mod Integrator, is a mod manager for Deep Rock Galactic. It is an external program separate from the game that allows you to install and manage mods. You can organise mods into profiles, change their load order, and even install mods that are not on mod.io (through .pak files).
1.2 Why should I use MINT?
I’ve seen time and time again that the built-in mod manager in Deep Rock Galactic is buggy, difficult to use, and not approachable for new and veteran players alike. Common bugs include mods unloading randomly, mods not downloading when joining your friends, and mods showing as subscribed on mod.io but not in-game. These issues have been amplified by the S5.10 update, which changed how the in-game mod manager worked.
By using MINT, you won’t have to rely on the in-game mod manager, and you have full control of how your mods are organised and which ones you want to install, without having them randomly uninstall themselves. Furthermore, you can load mods that are not available on mod.io, which are in the form of .pak files. These are found across various DRG communities and are not available on mod.io, as these creators do not want to use this platform.
1.3 Installing an external program sounds scary. I don’t want to risk it.
No pressure. The source code for MINT is publicly available on its repository on GitHub. I know that doesn’t mean much, especially if you don’t understand code. But to reassure you further, MINT has been in use for over 2 years, and it’s highly recommended by the wider modding community for both creating and playing with mods.
If you have looked into MINT yourself before, you’ll likely have found that there are numerous forks (different versions based on the original MINT). While some of these are popular, I have personally never used them, as the original MINT has worked for me. MINT itself is no longer updated, but still works to this day. So, it’s up to you if you want to try one of these forks, as they might have new features you want.
1.4 I came here for a guide on installation. Not an FAQ. Where’s the guide?
Sorry! Let’s get started.
2. Installation Guide
2.1 Getting a list of all your mods
Before we start with installing anything, let’s first get a copy of all your mods that you currently have installed so you can easily import them into MINT later.
- Subscribe to the “Copy Mod URLs” mod, found here: https://mod.io/g/drg/m/copy-mod-urls
- Load up your game.
- Navigate to the modding menu on the info screen. If your game does not launch to the info screen, you can access it by pausing the game → “Modding” tab → press “To Info Screen” button.
- Click on the Mods button to check that it has installed the Copy Mod URLs mod.
- Return to the Spacerig.
- Pause the game → “Modding” tab
- Click one of the “Copy” buttons. For example, if you want a list of all the mods you have enabled, click “Copy Enabled”. Or if you want a full backup, click “Copy All”
- Paste the contents of your clipboard into a text file, such as opening Notepad and pressing Ctrl+V.
2.2 Disabling the built-in mod manager
As of update S5.10, the built-in mod manager loads sooner than it used to. This means MINT can no longer automatically disable it. So, you’ll need to do a quick change to make it work again.
- On Steam, right-click Deep Rock Galactic and click “Properties”
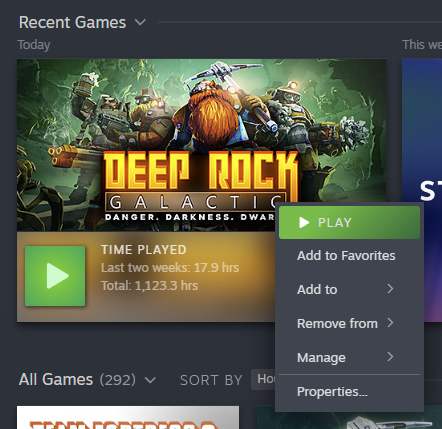
- Under the “General” tab (opens to this by default), you should see text that says “Advanced users may choose to enter modifications to their launch options”. Click on the box below it.
- In this box, type
-disablemodding\  - Close the properties window.
It might seem counterintuitive to put a flag that reads as disabling modding, but all this parameter does is disable the built-in mod manager. It does not stop you from using MINT.
2.3 Downloading and Installing MINT
- Navigate to the GitHub repository for MINT, found here: https://github.com/trumank/mint
- On the right-hand side, click on “Releases”.
- Under the version 2.10.0 release, click on the link that says drg_mod_integration-x86_64-pc-windows-msvc.zip

- This will download the Windows version in a ZIP.
- Once downloaded, extract the contents of the ZIP to somewhere accessible to you. For example, you could make a folder called MINT in your documents, and put the contents of the ZIP inside of that folder.
Now that you’ve downloaded MINT, you should see 4 files:
- CHANGELOG
- drg_mod_integration.exe
- LICENCE
- README
The important one here is drg_mod_integration.exe.
- Double-click the drg_mod_integration.exe file to load MINT. Windows may pop up with a SmartScreen prompt, which you need to allow so that the program launches.
- A separate console window will appear with log messages from MINT, and shortly after, MINT’s graphical interface will appear.

- Now you are ready to configure MINT to be able to download and install mods.
2.4 Configuring MINT to download mods
- Press the small cog icon to the left of “Lint mods”
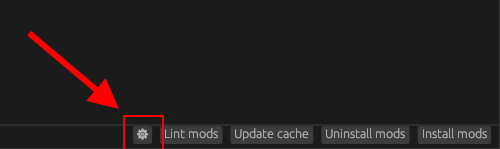
- The Settings menu will now appear.
- First, check that the “DRG Pak” path correctly points to the FSD-WindowsNoEditor.pak, found inside the game installation directory → FSD → Content → Paks
For example,C:\Program Files (x86)\Steam\steamapps\common\Deep Rock Galactic\FSD\Content\Paks\FSD-WindowsNoEditor.pak.- To find your game installation directory, right-click Deep Rock Galactic on Steam → Properties → “Installed Files” tab → “Browse” button next to “Size of installation”
- To find your game installation directory, right-click Deep Rock Galactic on Steam → Properties → “Installed Files” tab → “Browse” button next to “Size of installation”
- Next, you need to configure a mod.io OAuth token. This allows MINT to download mods from mod.io.
- Click on the small cog icon next to “modio”
- In the small window that appears, click on the blue “OAuth Token” text. This will open your browser to the mod.io website.
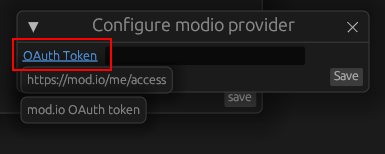 \
\
- Login to your mod.io account. Once you’ve logged in, if it doesn’t take you to the API access page, then click the blue “OAuth Token” text again to open it.
- Under the “OAuth Access” header on the mod.io page, click on the “New Token Name” text box.
- Give your token a name, such as “MINT”
- Now, press the “+” icon to add the key.
- You will be shown the OAuth Token. Make sure to copy it, as it only gets shown once.
- Go back to MINT, and paste this OAuth token into the empty box next to the blue “OAuth Token
- Press “Save” on the OAuth Token menu.
- Press “Save” on the Settings menu.
3. Usage Guide
3.1 Adding mods to MINT
Now that you’ve configured MINT, you can start adding mods. There are a few ways to do so:
- Click the “Add mod…” text box. Paste a Deep Rock Galactic mod.io mod URL into this box and press enter. Make sure to remove any suffixes, such as
#descriptionfrom the URL. For example, paste a URL like https://mod.io/g/drg/m/mits-mod-manager and then press enter. - Click the “Add mod…” text box. Paste the list of mods you copied from the “Copy Mod URLs” mod and then press enter. MINT can accept multiple mod URLs in one go, separated by a new line.
- Drag
.pakfiles into the MINT window. This will add the file you dragged to the current profile.
3.2 Installing MINT mods into the game
Finally, press the “Install Mods” button. MINT will package all the mods into one file called mods_P.pak and place it in your game installation.
You do not need to keep MINT open during your play session. Even better, you only need to press “Install Mods” once, and you don’t need to open MINT again (unless you want to add/remove mods or update mods).
3.3 Updating mods on MINT
Some of your mods will get updates. MINT does not automatically update your mods. Therefore, before you load up a Deep Rock Galactic session, it is best to first open MINT and then press “Update Cache” before pressing “Install Mods”. Then continue with launching the game.
3.4 Uninstalling mods from the game
To disable a specific mod, but keep it on your MINT profile (if you want to enable it later):
- Open up MINT
- Press the toggle button next to the mod you want to disable/enable
- Press “Install mods” to apply the changes. The “Install Mods” button acts more like an “Apply Changes” button.
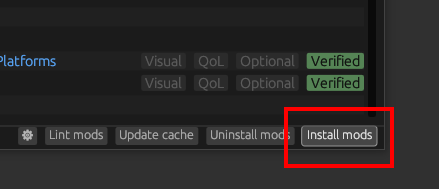
To remove a mod from a profile, which also uninstalls it from the game:
- Open up MINT
- Press the minus (-) button next to the mod you want to remove.
- Press “Install mods” to apply the changes. The “Install Mods” button acts more like an “Apply Changes” button.
To uninstall ALL mods from the game
- Open up MINT
- Press the “Uninstall mods” button.
- Your game will have no mods installed, but will still be in the disabled modding state. Follow the next section to fully uninstall MINT.
3.5 Uninstalling MINT
- Open up MINT.
- Press “Uninstall mods”
- Then press the small cog icon.
- Click both the “Config directory” and “Cache directory” URLs, which will open those folders in a separate window.
- Close MINT.
- Delete the config directory and the cache directory after closing MINT. If you delete them before closing MINT, it will recreate them again when it closes.
- Finally, delete the drg_mod_integration.exe file (or its parent folder)
- On Steam, right-click Deep Rock Galactic → Properties
- Remove the
-disablemoddinglaunch parameter. This will re-enable the built-in mod management.
4. Frequently Asked Questions/Problems
Some troubleshooting can be found on the MINT Wiki on GitHub: https://github.com/trumank/mint/wiki/Common-Errors-and-Troubleshooting
4.1 I get an error when I try to add/update/install mods: “authentication error: Unauthorized: Unauthorized”
This means your mod.io OAuth Token has expired. Create a new one by following the steps under the “Configuring MINT to download mods” section.
4.2 I get an error when I try to add/update/install mods: “ureq error: https://cdn.discordapp.com/attachments/…/…/oo2core_9_win64.dll”
This means you have a mod that requires an additional DLL to work with MINT. The specific DLL must be put in the same folder as the “drg_mod_executable.exe”. See this related issue on GitHub for further instructions: https://github.com/trumank/mint/issues/134
4.3 I get an error when I try to add a mod: “Could not find mod provider for “https://mod.io/g/drg/m/mod_name#description”
Remove the #description part from the mod URL and try adding it again. For example change https://mod.io/g/drg/m/better-waypoints#description to https://mod.io/g/drg/m/better-waypoints
5. Guide To-Do
- Add more images
- Add a video?
6. Questions/Issues/Bugs
Please feel free to reach out to me on Discord (my username is mitgobla) if you have any issues or suggestions for this guide.
Automation
DRG Modding Automation Scripts
- Some batch scripts to automate your projects, including packaging and local testing.
- Has whitelist/blacklist support, allowing you to manage multiple mods in the same project.
DRG Modding Automation Scripts Linux
- This is the same as DRG Modding Automation Scripts but runs for Linux.
Basic Tools
DRG Packer
- This is a wrapper for UnrealPak and you can run it without needing to download Unreal Engine.
- It allows you to unpack and repack your mod files.
FModel
- Open-source software for exploring the game files.
- From seeing the properties of an asset to listening to the audio files, it makes it very easy to navigate through DRG’s assets
UAssetGUI
- Open-source software for viewing and modifying the game assets by hand.
UModel
- A tool for viewing and extracting assets from the game.
Empty Content Hierarchy
- This is simply a collection of empty folders that make up the content hierarchy of the game files.
FSD Template
- A template UE4.27 project for Blueprint modding.
Audio Modding Template
- A template UE4.27 project for Audio modding.
Linux Tools
DRG Packer Linux
- This is the same as DRG Packer but runs on Linux compiled binaries.
UModel Linux
- This is the same as UModel but runs on Linux compiled binaries.
DRG Modding Automation Scripts Linux
- This is the same as DRG Modding Automation Scripts but runs for Linux.
Other
mod.io audit
- Audits locally installed mods from mod.io for conflicts.
- Helps to figure out which of your 49 mods are replacing a particular asset.
mod lint
- Scans the given mod for common problems as well as whether it should pass auto-verification.
- If a mod isn’t auto-verifying or is quite simply not working at all, this tool should point you in the right direction.
DRG Control Flow Graphs
- This is a collection of control flow graphs for the DRG’s blueprints.
DRG Fonts
- Collection of fonts used in the game.
.locres Editor
- A tool for editing .locres files.
UE4SS
- This is an extremely powerful tool for advanced blueprint modders to make debugging of blueprint mods during runtime significantly easier.
- The live view debugger lists every mounted object, and allows you to view and edit the exact values of every property of every object, during runtime.
- If you want to watch the how the value of something changes during runtime, you can assign a watch to the property and it will log every value (which you can log to a file).
Dwarf SDK
- A modkit for DRG’s assets, allowing you to view, edit and reference almost every asset fully reconstructed within the editor.