Blueprint Modding Guide
DRG Mods: A Comprehensive Guide to Blueprint Modding
Please do not hesitate to ask for help! You can find talented modders in the DRG RND Discord or the DRG Modder's Guild Discord.
Credits:
Buckminsterfullerene - Originally wrote and maintains guide.
OurLordAndSaviourGabe (AKA Banagement) - Advanced replication explanation section.
MichaelG123 - Secondary advanced replication section.
Contents
- 1. Introduction
- Tools
- Reading this guide
- Final note
- 2. How blueprints work
- How BP mods are loaded into DRG
- Framework mods
- Methods of BP modding
- Useful acryonyms to know for BP modding
- 3. Setting up your UEE workspace
- 4. No-dummy method
- Creating your first DRG mod
- A bit more complex version
- Outputting time dilation to the HUD
- Toggle HUD button
- Saving and loading settings
- Basic replication
- Advanced replication
- 5. Dummy method
- Kill player on button press
- Self-destruct Bosco on button press
- 6. Packaging your mod
- Using DRG Modding Automation Scripts
- From UE
- Directories to never cook
- More Help
- Video Tutorial
- Feedback
1. Introduction
Tools
Before you can even get started with your mod, you need to install a few tools:
- DRGPacker
- Unreal Engine
4.27.2(it will look like just 4.27.0 on the epic games launcher, which is good to download) - Visual Studio 2019 or 2022, with "Desktop Development with C++" and "Game Development with C++" packages checked in the Visual Studio Installer
- The most up-to-date game dumps (if you are using the BP dummy method explained later)
- The FSD template project (if you are using the C++ dummy method explained later)
IMPORTANT: By the time you are reading this guide, you should already have these tools and have at least the minimum required knowledge to use them (more on UE4 later). If not, I refer you to Rauliken's more general guide.
Reading this guide
Make sure that you read through every detail of this guide thoroughly as missing something may result in many problems down the line. Of course, you can always refer back to this if you need assistance on anything. Critically important details are highlighted in bold, and optional but useful information is highlighted in italics. Inline code is used for 'specifics'.
You should know the basics of Blueprinting in Unreal Engine. There are plenty of tutorials on YouTube. You should also know how Blueprinting associates with C++; here is a really good video on that. If you haven't already, watching this video is basically a requirement to understand much of what is going on here.
If you are into other forms of UE modding, please don't hesitate to join the UE Modding discord server.
Final note
Please be aware that as BP modding becomes increasingly advanced, this guide may become out of date until I update it. Since I'm really busy all the time this may not happen for a few days or weeks.
2. How blueprints work
How BP mods are loaded into DRG
Native spawning is something that was added by the developers when the modding update dropped. This allows you to load your blueprint from the BeginPlay event node. If you want your BP mod to have user-interactable UI (like a settings menu), you should use a framework like ModHub.
Framework mods
Usually, you will only want to use a framework mod if you want the user to be able to change settings for your mod in game. If you don't need this for your mod, you do not need to use a framework. Framework mods so far have always come in two parts:
- The devkit tools that you put into your mod's UE project for interfacing with your mod
- The in-game mod dependency that runs all of the framework's functions and processes
I suggest that for now, as you are learning BP modding, that you don't touch any frameworks, otherwise you'll find yourself spending more time wrangling with widgets than actually learning new techniques.
ModHub
ModHub is a shared-settings mod interface. You can use this to add your mod settings to a central place.
DRGLib
Samamster has been developing this framework as a more feature-rich BP modding library. The great thing about this library, is that it provides helper functions and DRG-like UI objects that makes BP modding just that little bit easier. You can view both the source and guide for use here.
Methods of BP modding
There are two methods, in a way that you can use both at the same time or not if you wish:
- No-dummy method. This doesn't require any knowledge in C++ to use. You also won't need the game dumps. This is limited to built-in UE BP functions and events or those you have from a framework devkit, or you created yourself. You can still achieve a fair bit from this but are limited.
- Dummy method. You can manipulate the functions, variables and events that are running in the game. You can figure out what you need from looking at the game's dumps files. You can find the most up-to-date dumps versions here (be aware that GitHub only displays the first thousand classes on its website version).
Useful acronyms to know for BP modding
- ABP – Animated BluePrint
- BP – BluePrint
- GD – Game Data
- GM – GaMe
- ID – IDentifier
- ITM – ITeM
- LIB – LIBrary
- LVL – LeVeL
- MUT – MUTators
- OC – OverClocks
- PRJ – PRoJectile
- UI – User Interface
- UPC – UPgrade Category
- UPG – UPgrade Group
- W – Widget
- WND – WiNdow Widget
- WPN - WeaPoN
3. Setting up your UEE workspace
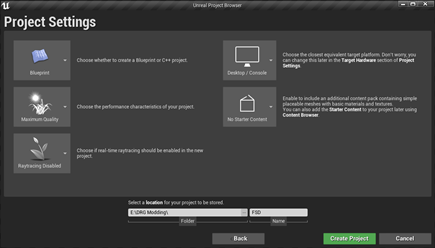
For ANY Blueprint mods, you MUST name your project FSD. Therefore, I make all my mods inside the same project and then delete the mods I don't want to pak before I pak them. The reason the name must be FSD, is because that is what the original game's UE project is called. "FSD" is probably the code-word for DRG (most games have these for various reasons).
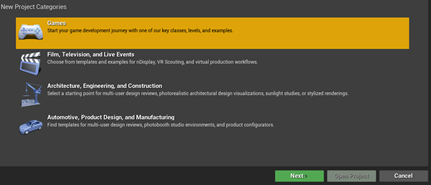
First, select the games category, then click next:

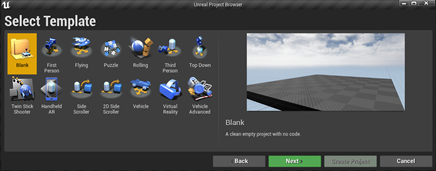
Then click on blank and click next:
Select the following options on the project settings:
Then hit create project, and you're ready to move onto the next part!
4. No-dummy method
I'm going to run through the creation of a super simple mod which then outputs text to the screen, and finally saves and loads mod data. Note that my UE might look different to yours – don't worry, I'm just using a couple of plugins that makes it looks nicer.
Creating your first DRG mod
This mod will simply set the global time dilation (the speed) of the game to 5. The purpose of this mod is to just run through the process of making a mod – the time dilation bit will validate that we know the mod is loaded.
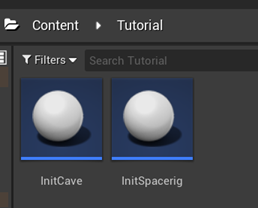
To spawn a blueprint into the game, first you need to create a folder with the same name as your mod inside the Content folder. Then create a blueprint inside of that called one of two things:
-
InitSpacerig– this will load your blueprint when the player is spawned in the spacerig. -
InitCave– this will load your blueprint when the player is spawned in the drop pod at the start of a mission.
To make a blueprint, right click inside the content browser and hit Create Blueprint Class. Then inherit it from Actor.

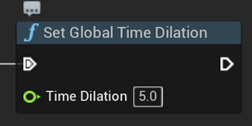
Double click on InitSpacerig first, and navigate to the Event Graph tab. We can ignore Event ActorBeginOverlap and EventTick. Drag off Event BeginPlay and find the set global time dilation node:

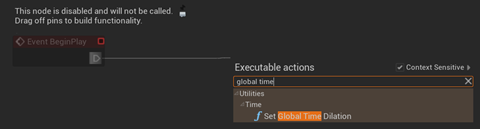
Now set this to 5.

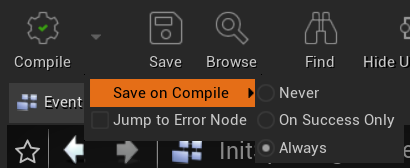
To save, hit the Compile button on the toolbar. Remember to compile and save your project every now and again. Tip: you can compile and save at the same time when you click compile, by clicking the little arrow dropdown to the right of compile button and setting save to "always":

Now we are ready to package and test this simple mod.
Refer to section 6 on packaging your mod.
When you load into the game, everything should be moving 5x as fast! More importantly, now you know how to make blueprint mods!
A bit more complex version
This time around, the mod will change the time dilation based on a key press.
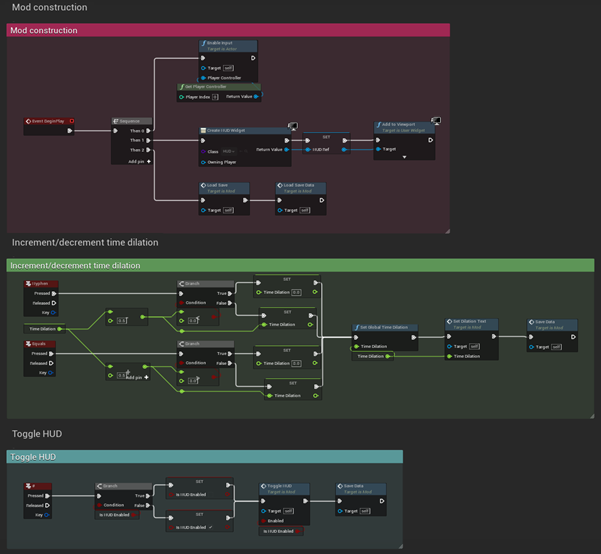
First though, let's streamline the same mod to be loaded by both InitCave and InitSpacerig, since we don't want to copy and paste everything into both BPs.
Make a new BP called something like Mod (it doesn't matter). Now in InitSpacerig and InitCave, we want to spawn this actor immediately. Get out a Spawn Actor From Class node, and set the class to whatever you called your mod BP. Do this in both InitSpacerig and InitCave:

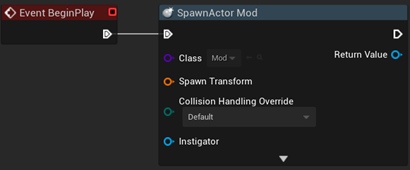
We're not quite done yet, we need to set Collision Handling Override to always spawn, ignore collisions. Also, right click on that orange Spawn Transform pin and hit split struct pin. If you don't do this, it won't know where to spawn the actor. Later on, if you're spawning a physical actor but don't want it to be seen, spawn it at like Z=99999.
Make sure to compile and save when you're done in both BPs!
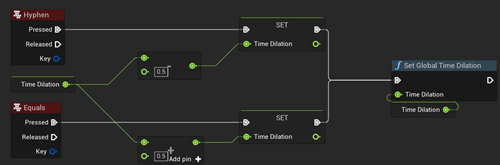
Now inside of your new mod BP, we want to add the functionality that increments or decrements the global time dilation based on what key you press. Let's say that the hyphen key decrements it by 0.5 and the equals key increments it by 0.5.
First, let's make a variable that stores the time dilation. Set its default value to 1. Now we need to get the key events. Right click on the graph and type Hyphen and get out that node, and then do the same for Equals. Make sure that you enable input when the mod is spawned, otherwise this won't work:

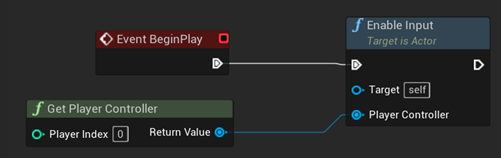
Player index 0 is always host, i.e. your player if you are the only one in the server or hosting a server.
Now make your mod functionality like this (you should have done basic blueprinting before as a pre-requisite to this so you should be able to easily follow what this does):

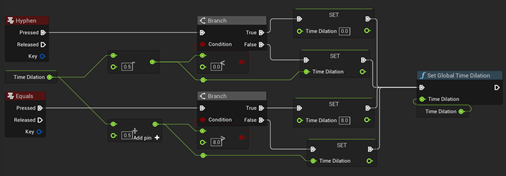
Now let's make sure that the dilation never goes below 0 (otherwise the game crashes) or higher than 8 (otherwise FPS is reduced the rubble):

Before we go any further, let's compile, package and test the mod.
Outputting time dilation to the HUD
Now we want to output the current dilation to the HUD (Heads Up Display) so we can see the value in-game.
In our Tutorial folder, make a new widget blueprint called something like HUD:

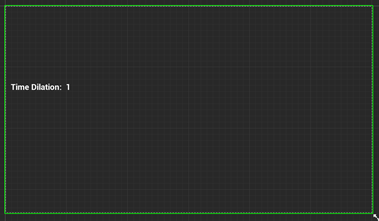
Inside of the widget designer, find the text box widget in the palette and drag it out. Place it anywhere on the window – I recommend putting it about 2/3 the way up the left or right side of the window, which is where we know there is empty space on the DRG HUD. This text will just be some text like "Time Dilation:". Next to it, put another text box with the text "1". This is where we will change the value. The default dilation in the game is 1 so we set the default text to match that.

Now name that second text box to something sensible. You also need to check the Is Variable box, otherwise we won't be able to change it from our mod BP.

![]()
Hit Compile and switch back to the mod BP. To access and set our text box, we need to first construct the widget and get an object reference from it:


This HUD Ref variable is our object reference. The variable type is that HUD widget:

![]()
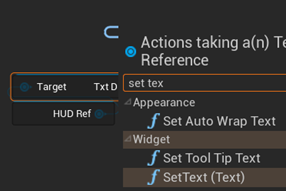
Now drag out the HUD Ref variable and we want to get the object reference to the txtDilation:


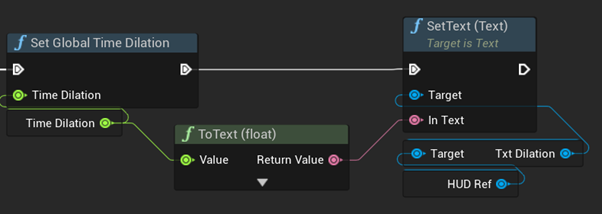
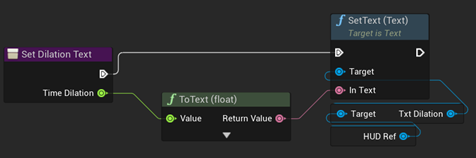
Now to set its text, we drag out the Set Text (Text) node:

Now we want to set the text to the value of time dilation:

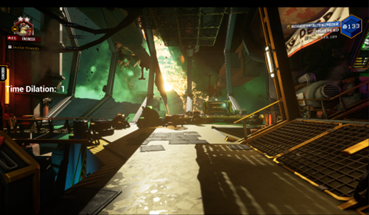
Now we can see our time dilation and that it changes when we hit our key binds. But what if we want to toggle the HUD on or off?
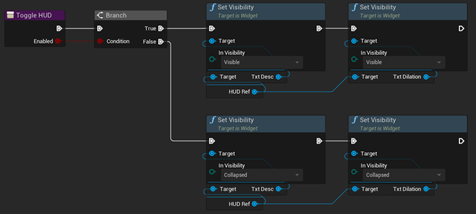
Toggle HUD button
First, we need to go back into our HUD designer and set that description text box to a variable so we can control it from our mod:

![]()
Now back in our mod, make a variable that will store the boolean value of whether or not the HUD is enabled. Make sure the default value is true.
When a key, say, '#', is pressed, we want to switch the visibily of the text boxes between Visible and Collapsed (you can read the tooltip regarding the differences between Collapsed and Hidden):

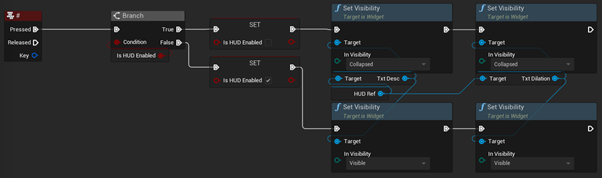
Let's check to see if this works!
Now… what if we want to save the dilation and if the HUD is enabled so that the next time the mod is loaded we save our settings?
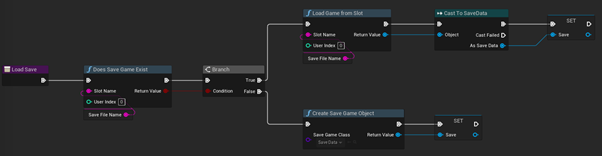
Saving and loading settings
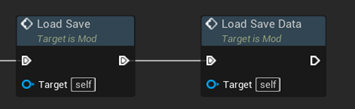
We first need to make a new blueprint that inherits the SaveGame class:

Inside of it, simply make the two variables that we want to save, and make sure that they are set to public:

Back in our mod, make a variable that is an object reference to this SaveData blueprint:

![]()
Now let's make a function that will load the save. This checks if the save game exists, and if it does, load the game from the slot. If it does not, we create an empty save game object. The save file name is Mods/[your mod name]/[your save name]. The saves are stored at FSD/Saved/SaveGames. Here my save name is Mods/Tutorial/Settings:

Call this function after we construct our widget (I've added a sequence node to tidy up a bit).

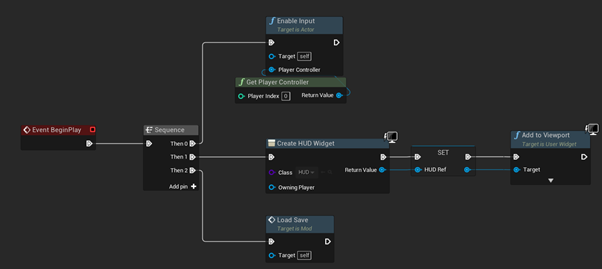
Now we want to make another function that loads the save data into our mod variables. We also want it to change the HUD values, i.e. if the HUD is disabled in the save, we want to toggle the HUD off when we load it in:


Chuck it after load save:

The Toggle HUD and Set Dilation Text functions are just what we have already done but put into functions so that we don't have duplicated code.


The last thing we want to do is save our values every time we change them. So let's make a new function that does this:

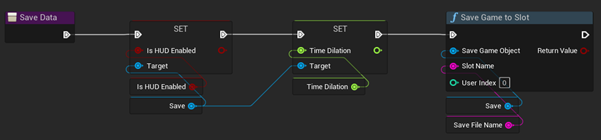
Now we call this function when we change time dilation and the HUD value. Now the mod looks like this (I've tidied it up with comments):

Now, compile, package and test. If you toggle your HUD off, and set dilation to like 5, then restart the game, your settings should be saved!
But we want this mod to work in multiplayer, so we need to do a bit of basic replication and handling with that.
Basic replication
Before you read this section, I suggest that you go watch some basic UE4 replication video on YouTube as it will explain the basic processes that I will use here. If you're not interested in replication (it's hard), don't worry, you can skip this section without any problems.
While the mod works perfectly fine in singleplayer, it goes all a bit funky in multiplayer. If you're the host, you need to replicate (copy) the time dilation that you're setting for the rest of the clients in the server. Otherwise, anything client side only (like player movement) will not be affected. And if you're not the host, then you shouldn't be able to change the time dilation because otherwise things get even more funky if yours is different to the server's.
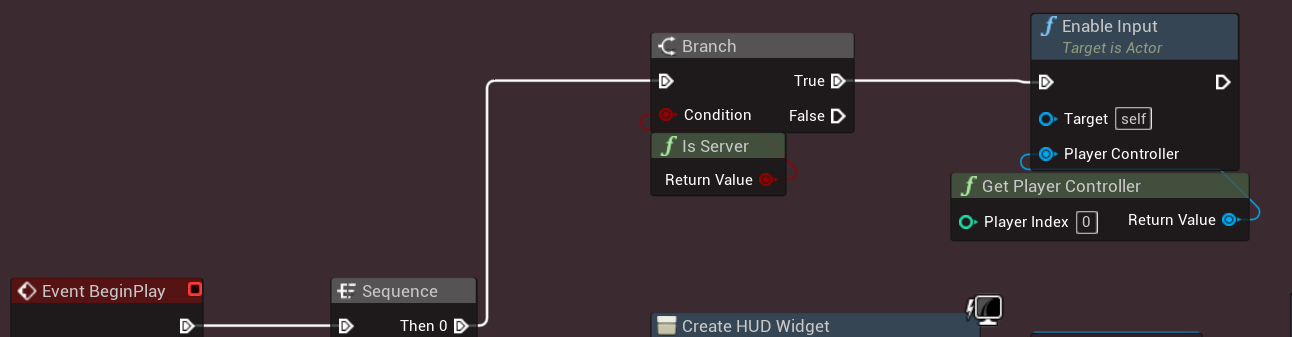
So firstly, let's just get the easy bits out of the way. If a client is not the server, disable the input so that they can't change their local time dilation value. We can do this by simply using the Is Server node:
We also need to prevent the time dilation from being set when the save is loaded. While we could do the same Is Server check before the entire load save section, we want to still allow all the clients to load the Is HUD Enabled value from their own saves. So we can just do the check inside of Load Save Data instead.

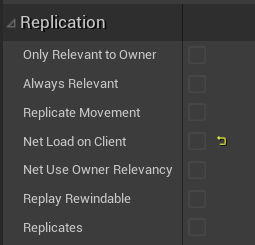
Now for the fun stuff. First, we need to change the mod settings to allow replication. Click Class Defaults on the top bar and change the replication settings like this:
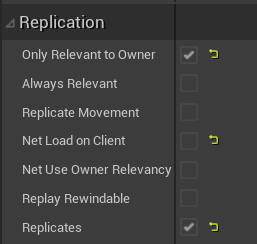
You also need to go into the class defaults for InitCave and InitSpacerig and change the replication settings like this:
Next, we need to actually set the Time Dilation variable to replicate. You can do this by clicking on the variable and setting the Replication parameter to RepNotify. The reason we want to use this, instead of just Replicated, is that we want to notify the clients when the value of it changes.
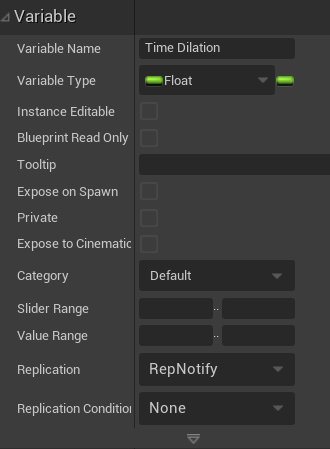
You may notice that in the functions pane, a new function called OnRep_ e.g. OnRep_Time Dilation, has been created. This function is called by every client whenever the value is changed, including the host. You may also notice that 2 white spheres have appeared on all the variables' getters and setters - this shows that the variable is set to RepNotify (one sphere is Replicated). You can also hover over the setters and it'll tell you how it works.
So inside this new OnRep function, when we then set the global time dilation and HUD value, we need to make sure that it only runs for non-host clients (AKA remotes). To achieve this, we can use the Switch Has Authority node and pull off execution only when remote. Then we set the global time dilation and the HUD text:

Then you're done! You don't need to call the OnRep function - this is done automatically everytime the variable is set.
Now to test, you will need a friend (oh no, this isn't looking good for you) to check that all the logic works as expected. To achieve this, you will need to make a new hidden mod on mod.io and use the preview link or add your friend as a moderator so that they can subscribe to it.
Advanced replication
For this section, you will need to download and build the FSD Template project (explained at the start of the 5th section).
"Advanced" replication here is defined as anything more than replicating just variables. This is really, really hard to wrap your head around, because due to the nature of this being modding, 90% of normal replication tutorials aren't going to help you. I highly suggest that you attempt to make at least one mod of your own first before attempting this.
There are two types of advanced replication you need to know about:
- Approved replication. This is a mod where we can be certain the code will run on the server, and the clients have the events sent to them due to the
RequiredByAlltag that you can give your mod to force everyone else in the server to have the mod. - Verified replication. This is where the mod only runs on the client, but still is able send and recieve events to and from other clients in the lobby. This is best used for mods that say, send chat messages to everyone in the server.
Firstly though, Banagement (AKA Our Lord And Saviour Gabe Newell) explains the main ideas of advanced replication using all of his vast experience (and amazingness).
A thorough explanation of advanced replication
Banagement here, I'll be taking over for a bit.
For an actor to replicate you will need to change a few class default variables on the new actor, these are - Always Relevant, Replicates.
If this was a pawn (character / enemy), some sort of actor with a model, or whatever may affect the world space and it is planned to move at any point then you would also enable Replicate Movement.Actor Components do NOT need to be replicated if the owning actor is replicated, this applies for Child Actors too.

With the above setup this actor will now replicate to clients when spawned by the server / network authority which means that only one has to exist instead of one per player.
When this actor is spawned by the server it will behave just like the host variant for clients so no de-sync should occur for most actions (this is explained in the "Info Passer Logic" section).
Later on I explain how you can also use this method to create a client spawned replicated actor so that the host / server can "see" the clients version of the actor and update their data accordingly.
You pretty much only want to use this client spawned method to pass data and not spawn anything that affects the world space.
If you are doing something more than just altering visuals for a verified mod such as "Fancy Steeve" then this can and will cause issues if it is spawned by the client.
For example if the client spawned actor were a model, pawn, etcetera it will create new "ghost" instance(s) that exist on the client but not on the host so data can be mismatched such as it being unable to be killed, messing with collision for the client and some logic called by a client owned actor can crash clients.
InitCave / InitSpacerig Logic
So let's take a look atInitCave or InitSpacerig actors, the same logic should apply for both. Ideally you would use InitCave or InitSpacerig to only spawn your own actors to perform your mod logic.
Before anything, I highly recommend NOT doing is using Child Actor Components on InitCave or InitSpacerig as there is a nasty problem that causes multiple instances of those child actors, usually exponential for clients. This can be fixed by spawning an actor via InitCave or InitSpacerig that spawns its own child actors.
Let's say you want to spawn an actor of some sort; you will usually want this to be a server only action so there are no "ghost" instances (described in previous section).
To achieve this it is as simple as using 2 nodes, Is Server pure function and Branch (you can press B and left click to quickly place in an event graph), just plug these two together to make a boolean check using the True or False execution pins. You will want to put the Spawn Actor From Class node on the True output, this essentially says "If Server / Host / Network Authority, then spawn this actor" so it is not possible for clients to do so. Supposedly using the Has Authority macro is what is used for actual game development but it can be confusing to utilize without understanding it well.
I bring the following up because it comes into play when setting up actor spawning. You do not want to use object references from something that has not been spawned yet as it will be a null pointer and will either crash the game or break logic in an actor that is trying to reference a specific class for criteria.
Unreal Engine 4 is silly and tells you that Sequence nodes are executed in an order, 1-2-3 as the logic completes. This is false, everything assigned to a sequence node is executed at the same time.
This can be circumvented with Delay nodes,Async nodes, Set Timer By Event nodes, delayed loops ( Sequence + Delay ), etcetera.
What I would recommend is using InitCave or InitSpacerig as a means to spawn your own logic actors rather than putting the entirety of the logic within it because it can cause a lot of issues.
You want to be able to differentiate your mod from others so you should name these spawned actors appropriately in relation for your mod.
This is an example from my Mission Content Randomizer mod:

You do not need to assign ownership at all from my understanding, I just did it as a precaution since I ran into so many issues for replication before figuring it out.
In this example I have the MOD_MissionRandomizer_InfoPasser spawned either on host or on client, I kept them separate so it would assign different owners depending but really you should be able to do it before the server check branch node since the client and server both need it.
Replicated variables used for passing info are limited to "core" variables to some extent, so - bool, int, int64, float, string, etcetera.
When it comes to replicated actors everything should replicate if the actor is set to, but passing info from one system to another seems limited from what I recall (could be wrong, have not tested).
Info Passer Logic
What we first want to do is make a brand new, empty actor unrelated to anything vanilla and make it replicate via enabling Always Relevant, Replicates.
This custom actor will serve as our "info passer" and everything game data related that needs to be passed will be done through this.
So now that we have an Info Passer actor that has replicated and always relevant enabled on it, make it spawned on the server and on the client; the host can now receive it on the network from the client and allow the server to alter the clients actor.
Here is an example of how I use the Info Passer for Mission Content Randomizer:


So, I designed this in a way in which the client spawned Info Passer does not do anything on its own as it always fails the server check so it never assigns the server variable info with data from the client.
However, the host spawned version does because each of those "server" variables are replicated so all instances of that Info Passer actor will sync their data when told to do so via this Multicast event.
Variables that are replicated have two white balls when viewed as a reference in the event graph.
Notice that all of the "client" variables are not replicated:

The "server" variables are replicated. There is no need for an Is Server node like in the screenshot below because this data comes from the host and is applied to the host and client.
I just use it for less data changing for the host.

This part is important! - Events can be assigned Multicast, Run On Server, Run On Owning Client and then Reliable or not:

A breakdown of the settings:
Multicastis designed for running an event on the server and client(s).Run On Serveris designed for a server only event such as spawning an actor via event.Run On Owning Clientis designed for client only logic such as particles, animations, sounds.
This will still act as a server event if the owning client is the server though, so I would recommend using it exclusively in a client variant of a logic actor or a simpleIs Authoritycheck and running off of false so the server will never do it.Reliableis an interesting topic for game development (not really applicable for modding), it is essentially like a "is this event so important that it should ALWAYS be passed on the network?", the more things that have this the more stuff that is being sent on the network so it can cause latency issues and such.
A good example of this is damaging players - you don't want clients to be able to skip damage instances while the network load is heavy, but a particle from an environmental piece somewhere? Nah, not important.
Generally speaking for modding you are always good to set it to true for reliability. BUT! If you got into a really complex mod such as my Mission Content Randomizer where you need to sync a lot of data you will encounter a problem with events, they have a limit of how many inputs and outputs (or maybe that was only for delegates).
Either way, a neat thing you can do is create a Structure in UE and assign variables with specific names and types of variables that you want to pass to clients.
Then you use that Structure for the input and output of the event. This will allow you to pass ONE variable that acts like a box, you open that box and take the contents out (different variables):


I get all of my replicated "server" variables and turn them into a Client Data Structure variable and pass it via the event call.
The Structure is then split on that event to set data for individual data assets on the client as I cannot pass it all at once into a single node:

Now that we have general explanations out of the way, let's try with a basic example that MichaelG123 runs you through.
Approved replication (written by MichaelG123)
There are 4 main actors that we need:
InitCaveInitSpacerigMasterActorReplicatedActor
I'll be referring to them by these names, but in your case you might want to change them to something that makes more sense for your mod.
You can think of MasterActor as the actor that you'll be using to interact with the server, and it handles spawning for ReplicatedActor. It's used for server-based things like changing terrain, spawning bugs, etc.ReplicatedActor is where you handle any clientside stuff such as going into 3rd person mode, spawning widgets, or preparing variables to send to MasterActor, and is usually where most of your code will end up.
Setup
Setting up InitCave and InitSpacerig are simple, just make them spawn MasterActor:

ReplicatedActor is simple to set up. First, you need to click Class Defaults near the top of the screen, and change the replication settings to this:

Still in ReplicatedActor, create a new variable and set its type to your MasterActor. Also make sure to enable Instance Editable and Expose on Spawn:

Now we need to setup MasterActor. First, create a function called something like Spawn Replicated Actor Per Player and add a new input of type FSDPlayer Controller to it. Then create a Spawn Actor from Class node and have it spawn ReplicatedActor like this:

Create a function called Subscribe to Player Join. Add a new input of type FSDGame Mode to Subscribe to Player Join. Inside the function, drag off of the FSDGameMode pin and create a Bind event to On Player Logged In. Drag off of the event pin in that function and select Create Event. Then select Spawn Replicated Actor Per Player from the list so that the function looks like this:

Now we need to run our functions, if the actor is the server:

Creating the mod
For everything you see here, I’ll be using examples from a couple of my mods - you can get the source code for a poke around here.
For any event that you’d like to have the client run, just put everything inside the logic inside of the ReplicatedActor. For example, if you want to play music for only for the client, I have this set up:

You can just call this from wherever you want, nothing special going on here. The different part comes when you’d want the server to do something (spawn things, destroy terrain, apply status effects, basically anything that everyone sees happen at the same time). Here, we need to make "twin" events, one in MasterActor and one in ReplicatedActor. This is what I have in MasterActor, because it’s up to the server to tell everyone to spawn the sound. Make sure you make pins for everything that you’ll need. Your MasterActor events should all be set to Multicast.


MasterActor events are called by their “twin” event in ReplicatedActor. Create a new event in ReplicatedActor and set its replication setting to Run on Server, create pins that match the pins in the MasterActor event, and just plug all of the pins from one into pins of the other.

And that should be everything. You can repeat this event process as many times as you’d like and everything should work out.
5. Dummy method
I'm going to run through making a couple of mods which utilise some of the C++ and dummy methods. Once you know how the basics work, you are then set to much more easily be able to experiment, test, and implement any of your own features that use any of the game's functions and BPs for your mods. The possibilities here are endless. Overview of the two example mods I will step-through in this tutorial:
- Kill player on button press.
- Self-destruct Bosco from a button press.
Both examples will still feature info on how to look at the C++ header dumps.
The very first thing you need to do is download and build the FSD Template project. This has all of the C++ classes automatically reflected in the project source. This saves modders a LOT of time, as there are thousands of classes!
Then you will also need the latest version's dumps from here. You will need to download a text editor or code viewer such as Visual Studio Code to view and navigate the dumps (I use CLion).
Kill player on button press
Scouting the C++ header dumps
Now, you will notice that there are a LOT of C++ classes in the dumps. Don't be overwhelmed – most of the main functions you will need are in FSD.hpp (although saying that, the file alone is 20k lines). If you need C++ from another class you know at the time what you are looking for – and if you don't, you can always search for key words that you are looking for and look through those files. You will be doing a lot of searching through files anyway, so you'll get good at this pretty quickly. Don't hesitate to ask in #mod-chat in the Discord where stuff might be located though.
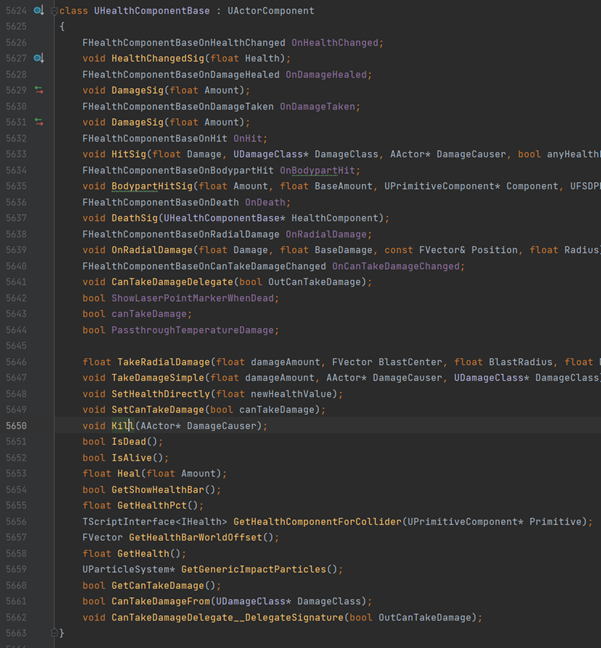
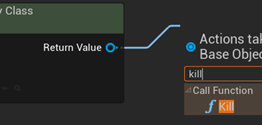
So, back to this mod example. We need to find the function in the game that deals with killing the player. As you should always do, start by looking in FSD.hpp as it is most likely to be there. Do Ctrl + F to open the search function (this is the same for all IDEs and code editors), and type Kill. You may see about 100 results. You could look through these manually, OR, you could try toggling on "match by word" option that most IDEs and code editors have. In CLion, it is a square button with a "W" on it.

![]()
So, here is a function that just kills the player when it is called. An AActor object is passed through but you can just ignore that as we don't need it. The important thing to do here is to check what class this function is inside. This is again relevant for any other functions you will find for your mods. So here, Kill() is inside struct UHealthComponentBase, which is a child class of UActorComponent, as denoted by the :.

When you are looking for functions and variables for your mod, you will come across some really interesting looking functions and variables. I have regularly come up with entire mod ideas just from being distracted when looking through the code. Every single function and variable in all these header files can be dummied… which is a lot of possibilities. Feel free to go wild!
Accessing the C++
Now we know where our Kill function is, we can go about accessing it from our BP mod. Make a new mod (I just made a new one in my tutorial folder and changed the InitSpacerig and InitCave to spawn that instead).
Inside your mod, right click and get a node called Get Component by Class. In the dropdown, you should be able to find the HealthComponentBase class:

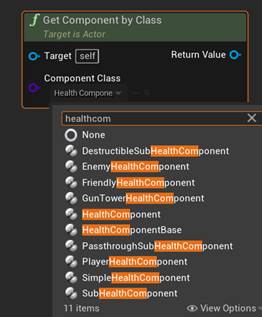
Then if you drag off the return value pin and type Kill, you should see a function that pops up called Kill. This is your function that you created inside the HealthComponentBase C++.

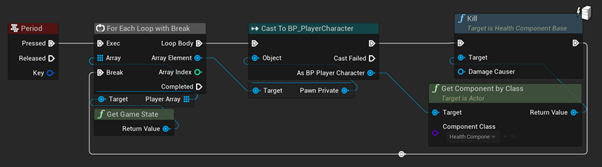
Now when we press a key, say, the period, we want to kill the player:

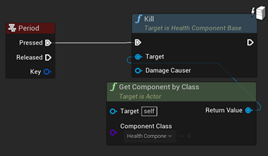
There is a problem with this though! You cannot just call the Kill player function, as you will notice that the component by class node requires a target, which will be the player to kill.
To get the player you want to kill, we need to get the game state player array, loop through that player array then cast the array elements to BP_PlayerCharacter pawns, which you can then use as the targets.
Dummying player character BP
But what is BP_PlayerCharacter? This is a blueprint class that the game has that controls all the logic for the player. We need to dummy this in order for our killing player to work.
In the dumps, navigate to APlayerCharacter : ACharacter. You will see that this is where all the info about the player is stored. ACharacter inherits from APawn, which inherits from AActor. This is important to know because when you dummy blueprints, you can set the parent to be super parent (i.e. the highest in the hierarchy).
Create a folder inside Content called Character. Here we are recreating the exact file path of the asset (you can find BP_PlayerCharacter inside of your unpacked files at this location). Now you need to create a new blueprint class called BP_PlayerCharacter. Inherit it from PlayerCharacter.
Once you create this blueprint, you don't need to do anything with it. Since we aren't dummying this file, we don't want to overwrite anything in the game with it so that is why we don't change any values. All we are doing is accessing the REFERENCE to the blueprint for the mod.
Now, back in your mod, let's get to work on this logic.
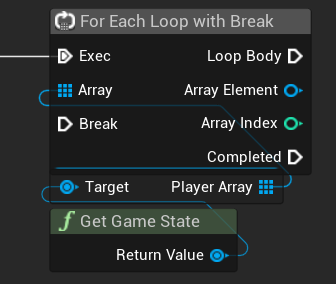
First, there is a node from the UE base Gameplay Statistics library called Get Game State. Drag off the return value and type Player Array; we want to get that. Then drag off player array and create For Each Loop with Break node. This will loop through all players in the player array and stop when it receives the break call. If you are in a multiplayer server, all the players in the game will be registered in this player array. So, if you just use a for each without a break, you could kill all the players in the game, if you wanted. This cluster of nodes will be very useful for your mods.

Now drag off the loop's array element and type Pawn Private. Then from the output of that read node, type Cast To BP_PlayerCharacter. Connect the execution node for that cast into the loop body.

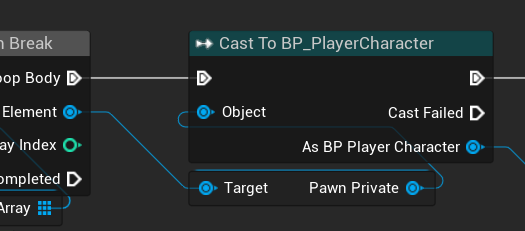
Now plug in your Kill function execution node, and your target from As BP Player Character from the cast. Then, if you want to kill just the first player in the player array, hook up the end of the kill function execution to the break for the for each loop with break node. You don't have to do that though, as mentioned above.

Make sure that you enable input on BeginPlay!


Before you package your mod, you have to make sure that you set your directories to never cook to include the Character folder. This is because if we pack our dummied BP_PlayerCharacter, the game will crash. This is explained in section 6, packaging your mod.
Self-destruct Bosco on button press
Scouting the C++ header dumps
First off, we want to find BP_Bosco in the header dumps. It is nicely called BP_Bosco.h. You will see a function called SelfDestruct() inside of it.

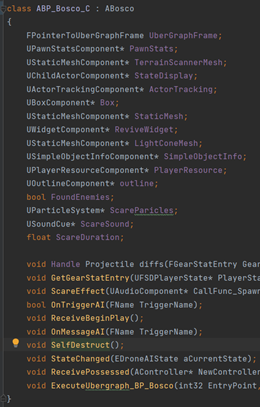
If you go into FSD.hpp, and search for ABosco (which is what this class inherits from), you will also see SelfDestruct and a bunch of other functions. Let's say that I also want Bosco to salute before he self-destructs. When writing this tutorial I was just planning on him self-destructing but saw that PlaySalute() function and just knew I had to include it. That'll happen a lot when you are looking through the dumps :)
Before we make the dummy blueprint, we need to figure out what class it needs to inherit from. So, if you look at the struct ABosco line, you will see a :, which as described previously, means "inherits from", then the class it inherits from to the right. So here we see that ABosco inherits from ADeepPathfinderCharacter.

![]()
If your IDE has the feature, you should be able to just hover over the name and it will tell you what that class inherits from and click to go to the location of it. If not, don't worry, as you can just search the file for that classname manually.

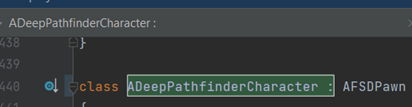
So you will see now that this class is inherited from AFSDPawn. Now we search for what AFSDPawn is inherited from, and we will see APawn.

![]()
APawn is a base UE class so that's as far as we need to go – but now we know, that ABosco is a child class of APawn, even though it is a bit down the inheritance tree.
Creating the dummy BP
Now, we need to recreate a dummy blueprint in the same location where this guy is in the game files, like we do for hex mods. So in your unpacked files, search for BP_Bosco. It should be inside Content\GameElements\Drone.
Inside your project files, navigate to that file location and create a new blueprint class. Since we discovered that ABosco is a child class of Pawn, we can select Pawn class to inherit from. We name the blueprint BP_Bosco. It should look like this:


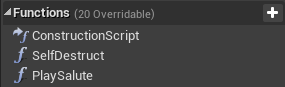
Inside of this, all we have to do, is create two functions, one called SelfDestruct, and another called PlaySalute. That is literally all you have to do. This now allows us to call these functions without having to touch any C++.

Now, to call on our blueprint, all we have to do is create a node Get Actor of Class and select BP_Bosco in the little dropdown. Then drag off the return value and type Play Salute.

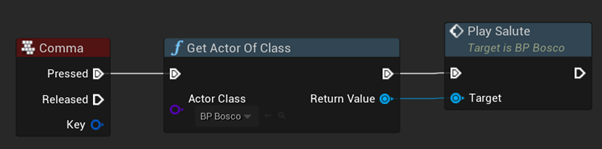
Now, let's put a short delay between saluting and self-destructing, and then call the self-destruct function.


6. Packaging your mod
When you want to test your mod, there are two options for packing:
- Automatically using DRGModdingAutomationScripts that Samamstar and DrTurtle made. I really highly recommend using this as it saves a LOT of manual time!
- Manually from UE then using
DRGPacker.
There's also directories to never cook, which is an extremely important setting, so make sure you scroll down to read that part too.
For either method, if you are getting a game crash on launch that looks like this:
Error: AddAssetData called with ObjectPath /some/path/ which already exists. This will overwrite and leak the existing AssetData.
Error: AddAssetData called...
...
...
[2023.05.13-21.27.01:936][ 0]LogCompression: Error: FCompression::UncompressMemory - Failed to uncompress memory (3103/9686) from address 000002672E4A73C0 using format LZ4, this may indicate the asset is corrupt!
Then you need to go into packaging settings and uncheck Share Material Shader Code.
Using DRG Modding Automation Scripts
First head to this GitHub repository. Then hit the big green Code dropdown and download the code using your preferred method (e.g. download as ZIP). Then extract the DRGModdingAutomationScripts folder and follow the instructions on its README file. Once you are setup, all you need to do is double click a .bat and it'll do whatever the bat says it does in the README.
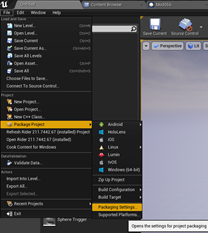
From UE
Go into the Untitled tab. Click File -> Package Project -> Packaging Settings.

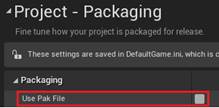
Make sure that this Use Pak File option is off.


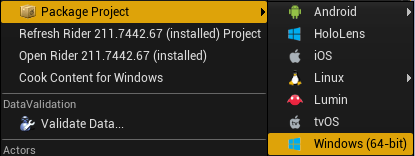
Now, package your project by clicking File -> Package Project -> Windows (64-bit).

Then selecting a folder to package to:

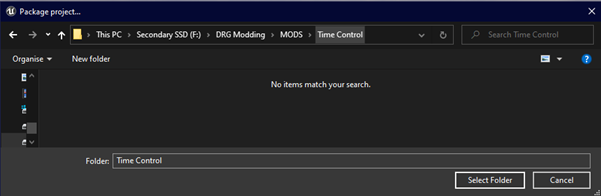
Tip: if you already have an old cooked folder in there, delete it then click on the parent folder again in the top bar. Because otherwise, since you selected the old folder, it will cook into WindowsNoEditor again, even though you deleted the old one. This sounds confusing so if you just try it yourself you'll understand what I mean.
Assuming you didn't do anything wrong, your project should package after about 30 seconds (differs on how large your project is - when using the FSD-Template, the first time around takes many minutes).
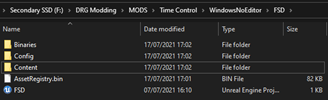
Now, navigate to the packaged files and delete any stuff you don't want to pak (other mods etc.).

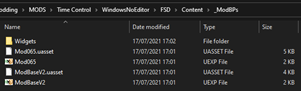
Now copy both the Content AND AssetRegistry.bin files, and put them into the input folder inside your DRGPacker.


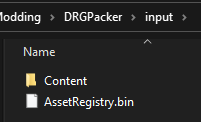
Then drag the input folder into _Repack.bat. Remember to rename the .pak to your mod name. Then navigate to DeepRockGalactic\FSD\Mods\ and make a new folder with the same name as your mod. Then put the .pak into that folder.
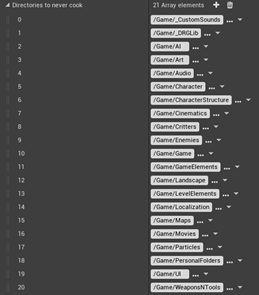
Directories to never cook
You can set directories to never package, which is useful when you don't want to pack say, any of the dummy BP folders. Although you don't have to do this, it does mean that you don't have to delete these files manually within the cooked files, every time. To do this, click the little dropdown arrow in package settings, just above the Project tab:


Then in directories to never cook, press the + button to add directories to the array. This is what mine currently looks like:

More Help
- codertrevor has created his own blueprint modding guide with some really great examples to run through: https://codertrevor.github.io/DRG-Modding-Tutorials/
- There are some forum posts in the modding discord that you can follow/ask questions in about misc questions people have had, e.g. "First BP Experience"
- The #learn-blueprints channel in the modding discord has some nice snippets of blueprints that you may find yourself needing
Video Tutorial
Tutorials playlist
Important announcement: these video guides are now very out of date, with methods inside still working but newer, less tedious methods now exist. I suggest that you follow this written guide first.
Created by myself, featuring a segment recorded by Samamstar and edited by Hand Drawn Nerd, this guide aims to walk people through the complex process of BP Modding!
These videos are not intended to replace the written guide.
The segments recorded include:
- Introduction info and setting up your workspace
- The basics of setting up native spawning, native spawning with DRGLib & pre-native spawning with BPMM
- The no-dummy BP modding method, using the pre-native BPMM method and then converting the same mod to native using BPMM's interface
- The dummy BP modding method, which includes how to navigate the C++ header dumps, as well as reflect them and dummy BPs
- Reflection demo, which shows exactly how to reflect some certain C++ objects/delegates/functions/properties that weren't covered in episode 4
Feedback
Hello modder! If you found this guide useful, I invite you to rate it in this form. Feedback is optional, but very welcome.